
MemberPress

Plandalf for MemberPress puts your Plandalf checkout where the MemberPress signup form used to be. Buyers pay through Plandalf, and the plugin gives them the membership as soon as the payment clears. MemberPress keeps your members, rules and content. Setup takes about fifteen minutes.
Warning. Early access These steps are for version 0.2.1 of the plugin. Set it up on a staging site first, and keep your MemberPress signup form live until your test purchase works.
Before you start
- WordPress 6.4 or later on PHP 8.2 or later, with MemberPress 1.12 or later active.
- A staging copy of your site on HTTPS. Plandalf needs to reach it to send purchase events.
- A Plandalf account.
- Email that works from WordPress. New members get their set-password link by email.
1. Get Plandalf ready
Connect Stripe
In Plandalf, open Settings → Payments & Tax Integrations and connect Stripe. When it says Connected, you’re set. You never enter Stripe keys in WordPress.
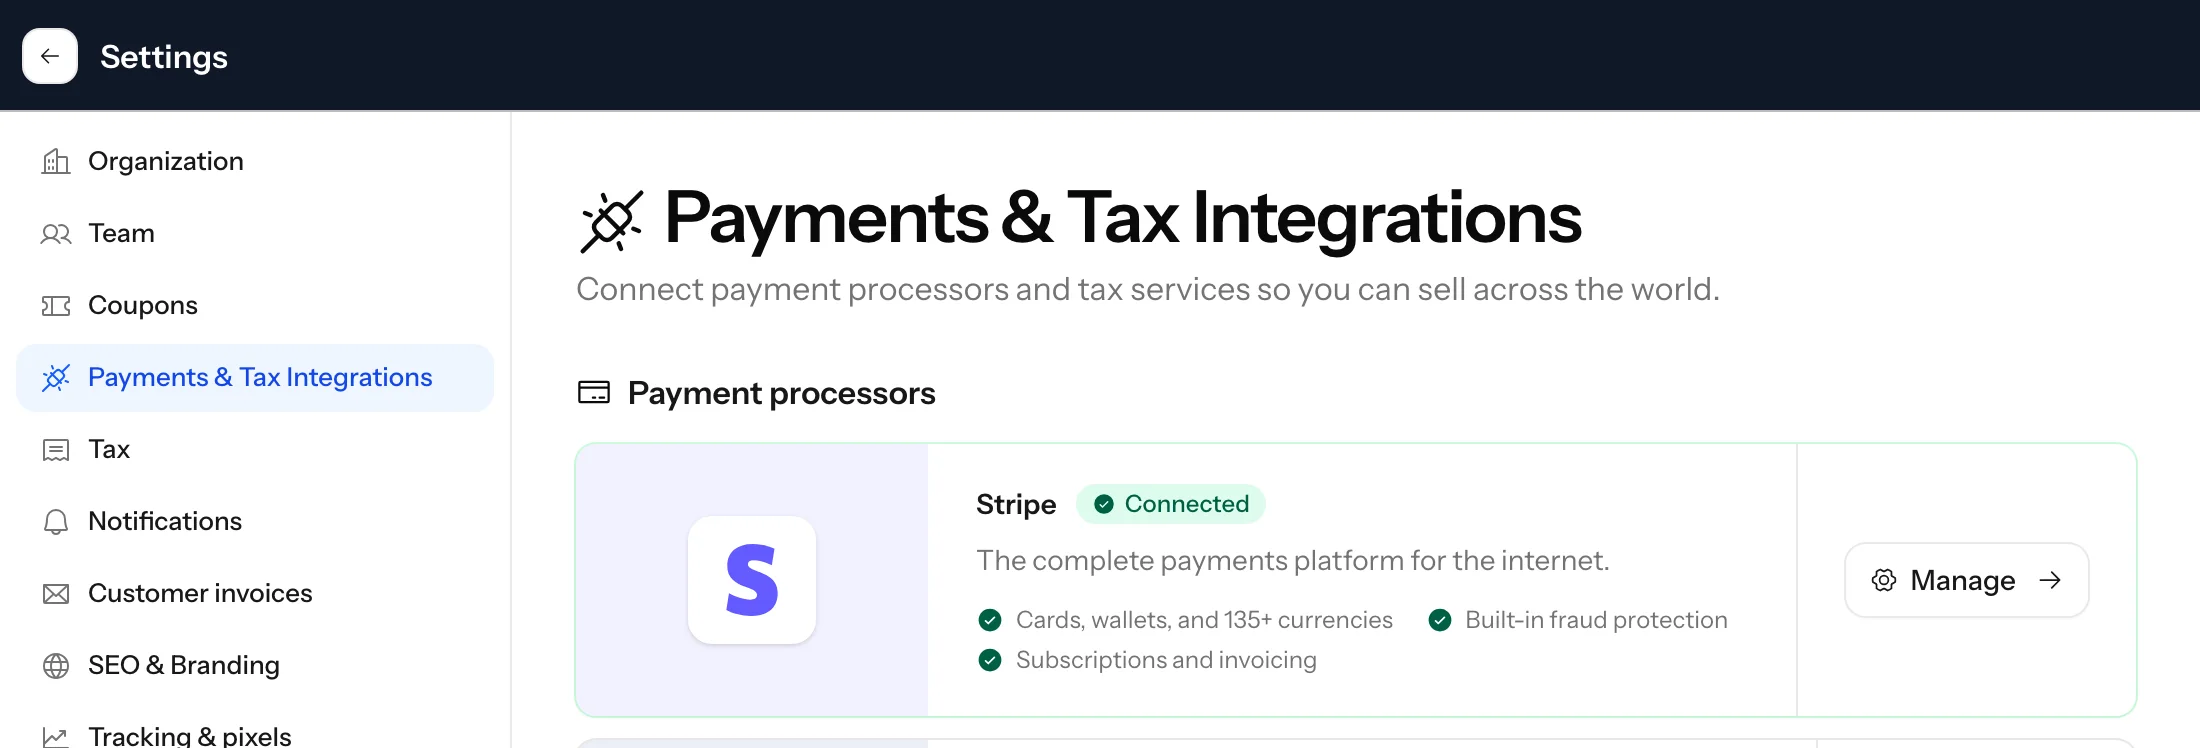 11Payments & Tax Integrations22Stripe shows Connected33Manage your Stripe connection
- 1Payments & Tax Integrations
- 2Stripe shows Connected
- 3Manage your Stripe connection
For staging, connect a Stripe test account so purchases use test cards and nothing is charged.
Publish a checkout
Open Checkouts and click Create New Checkout. Design the pages a buyer sees, then switch it to Active.
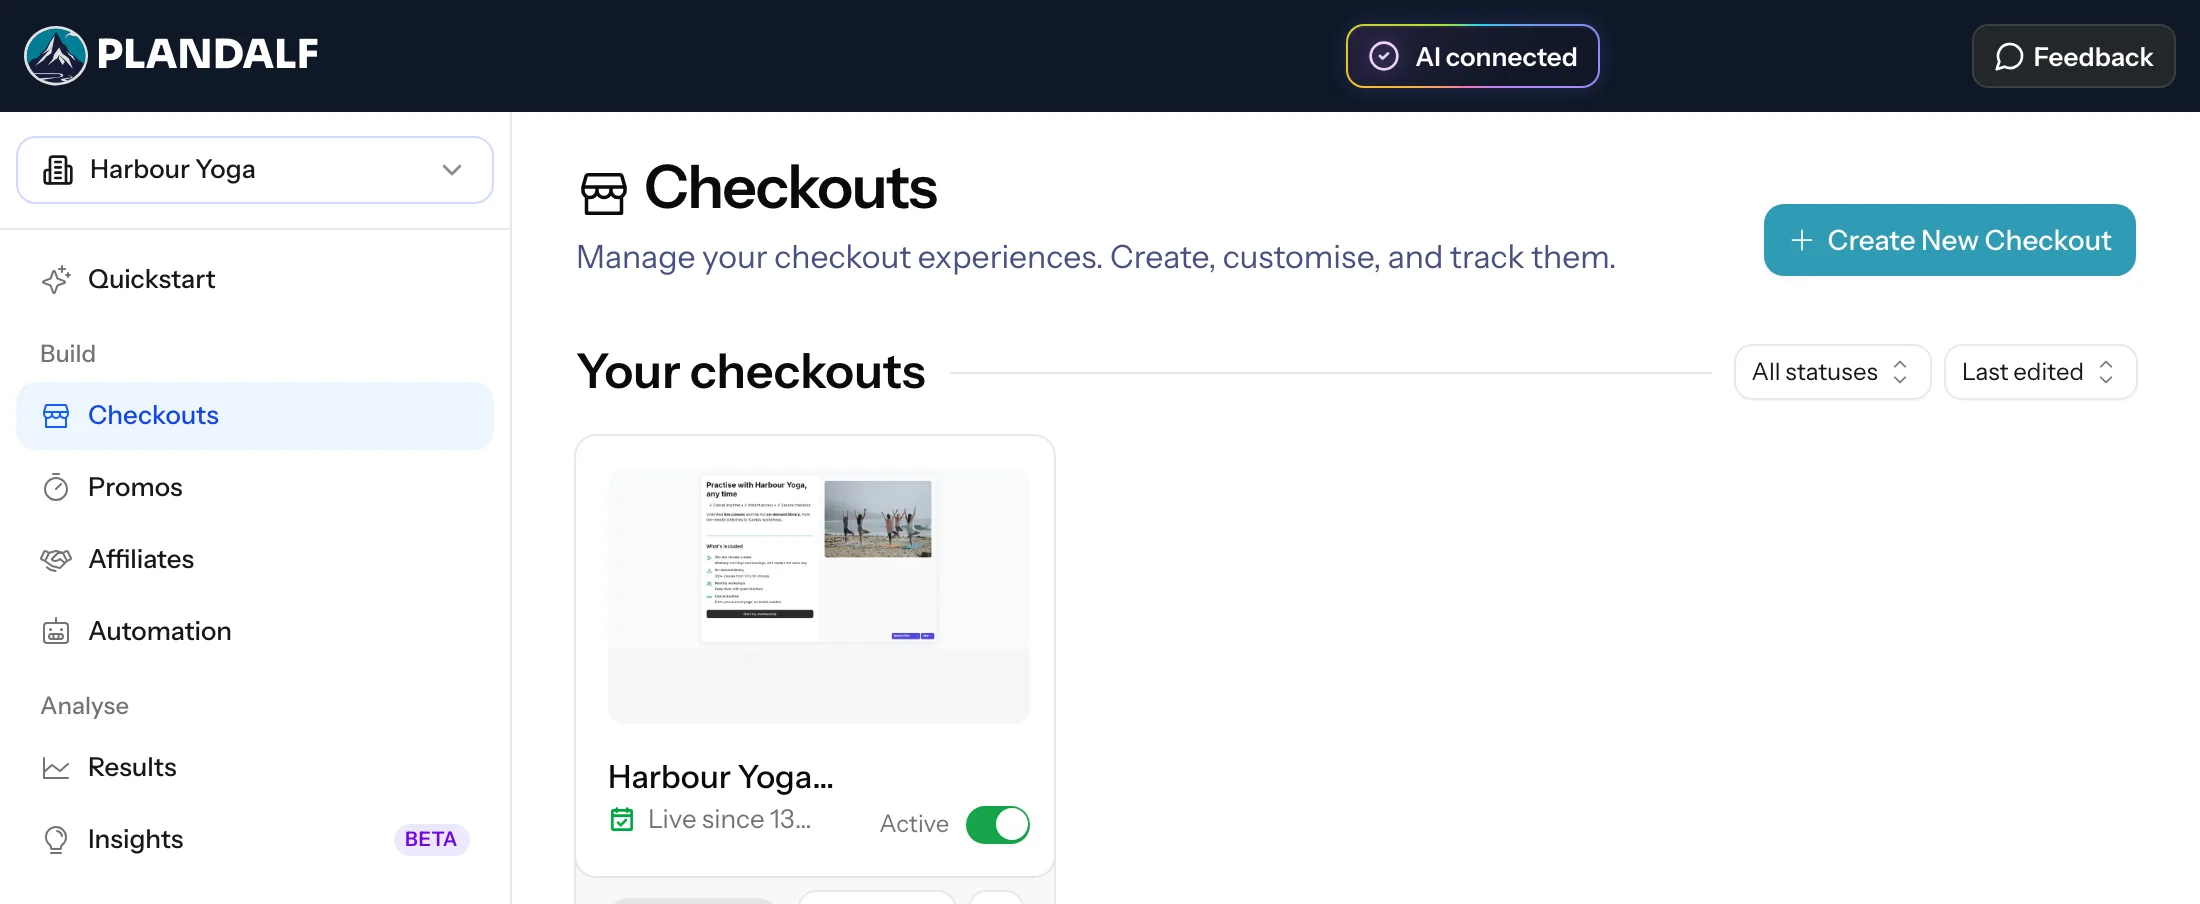 11Create New Checkout22Your checkout design33Switch it to Active
- 1Create New Checkout
- 2Your checkout design
- 3Switch it to Active
WordPress uses this checkout’s design and swaps in each membership’s own price, so one checkout can sell every membership. Keep it to a details page and a payment page for now: the plugin moves buyers on as soon as they’ve paid, so pages after payment, such as an upsell, don’t show yet.
2. Install the plugin
Download plandalf-memberpress.zip from the 0.2.1 release. In WordPress, go to Plugins → Add Plugin → Upload Plugin, choose the zip and click Install Now.
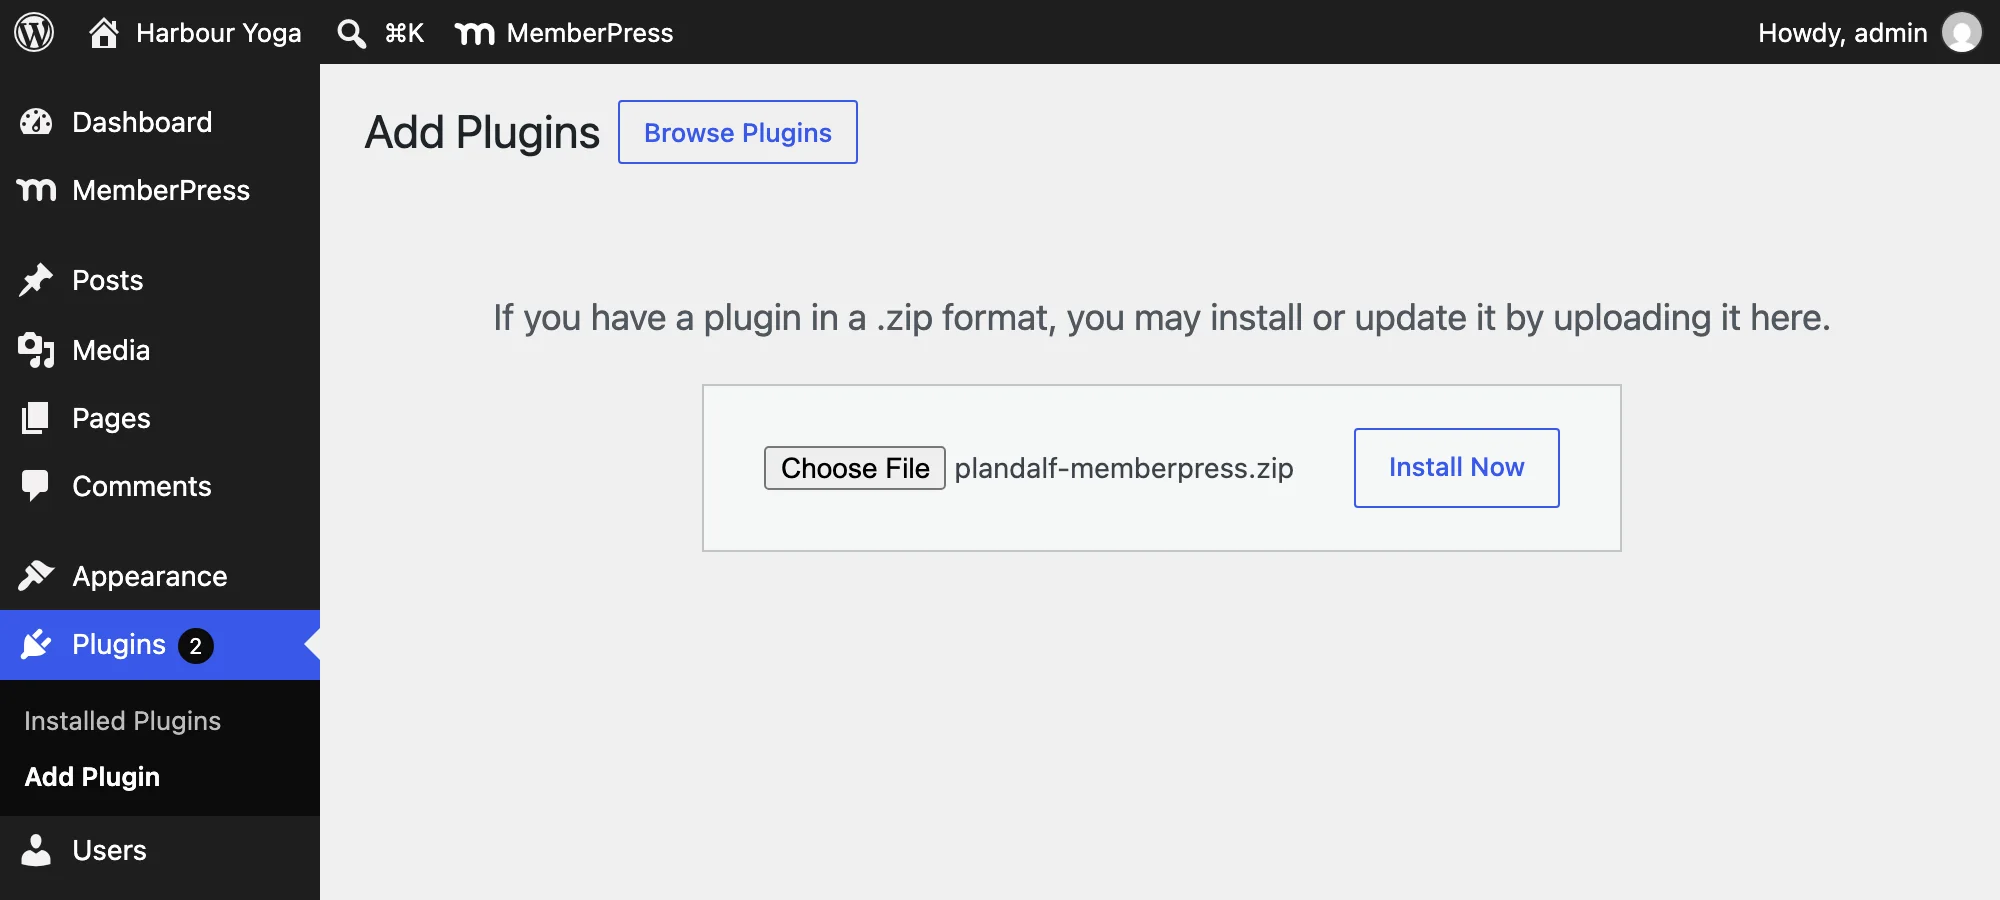 11Choose plandalf-memberpress.zip22Install Now
- 1Choose plandalf-memberpress.zip
- 2Install Now
Click Activate Plugin, then Set up under Plandalf for MemberPress.
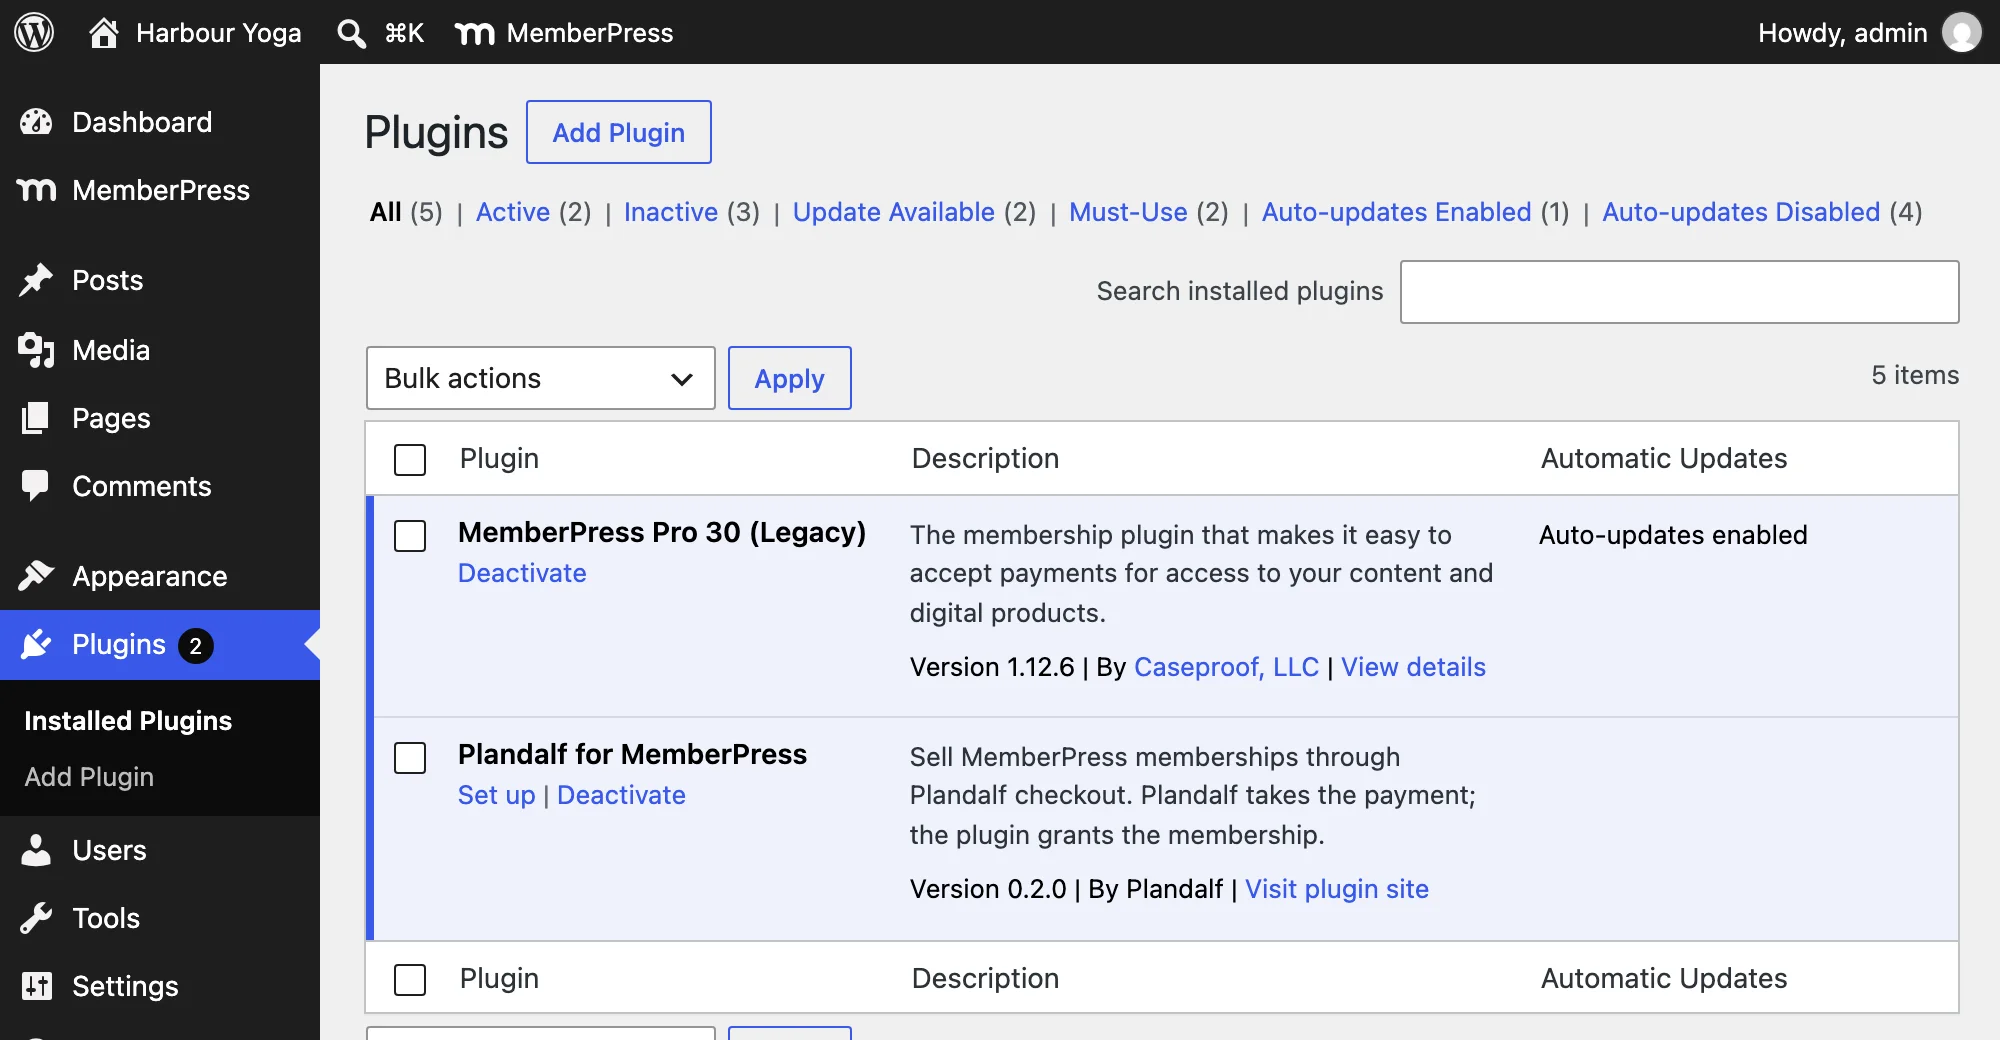 11Set up opens the plugin22The installed version
- 1Set up opens the plugin
- 2The installed version
3. Connect to Plandalf
MemberPress → Plandalf walks you through three steps, and each one turns green when it’s done. Start with Connect with Plandalf.
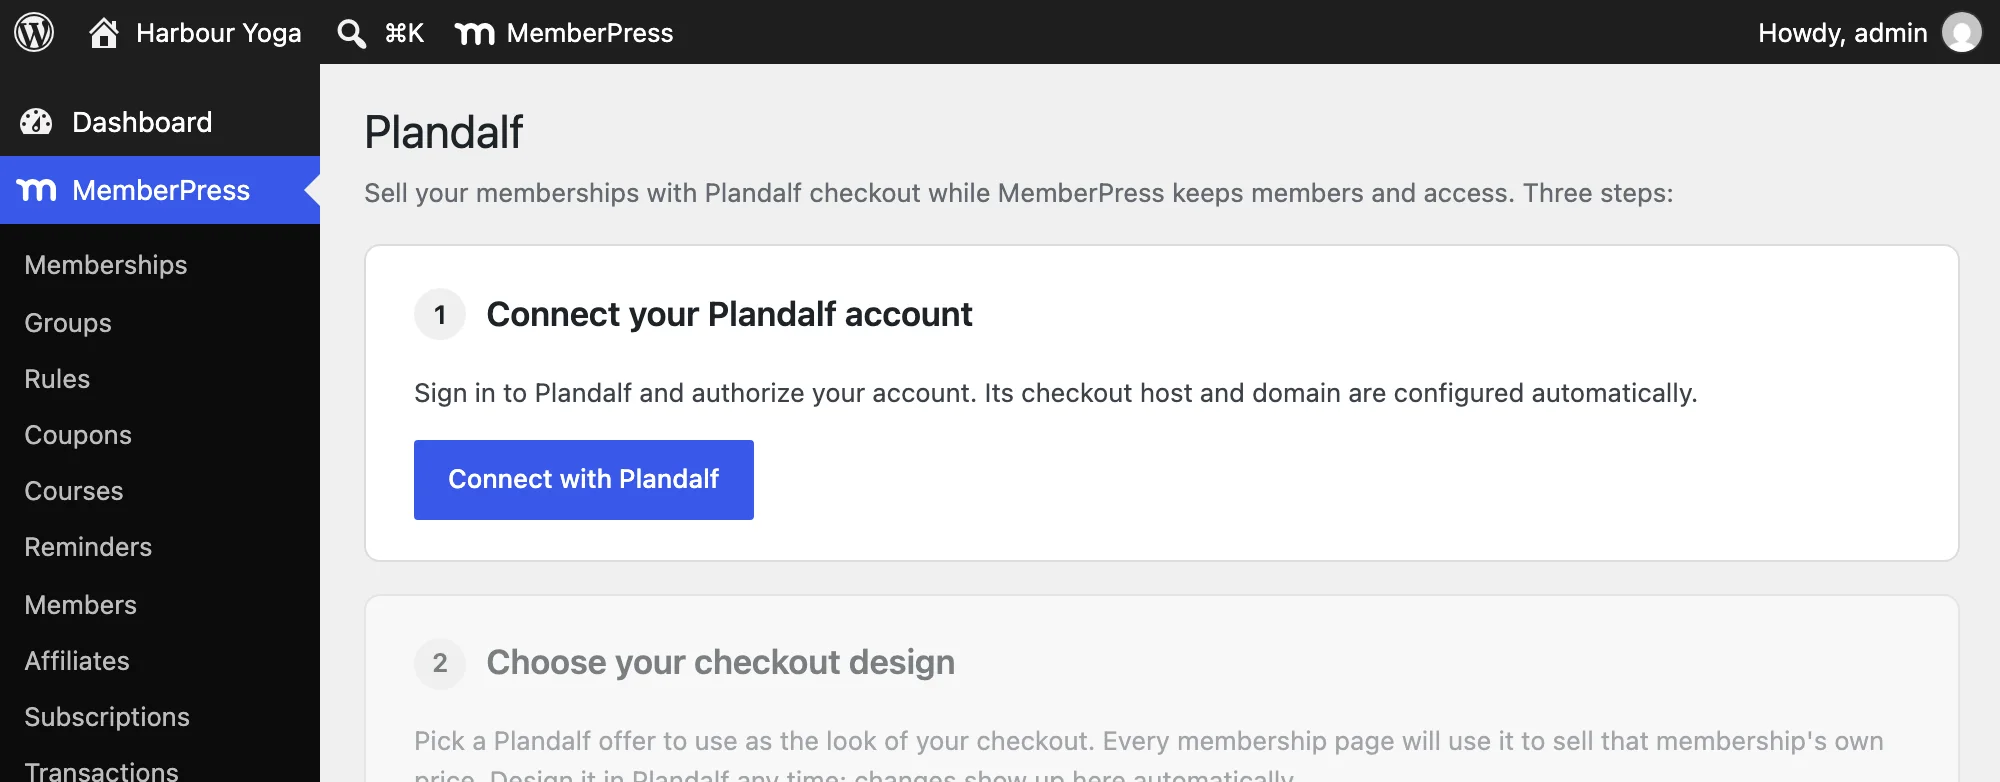 11Connect with Plandalf
- 1Connect with Plandalf
Plandalf opens. Sign in if it asks, choose your account, pick Test for a staging site (or Live for your real one), and click Connect with your site’s address.
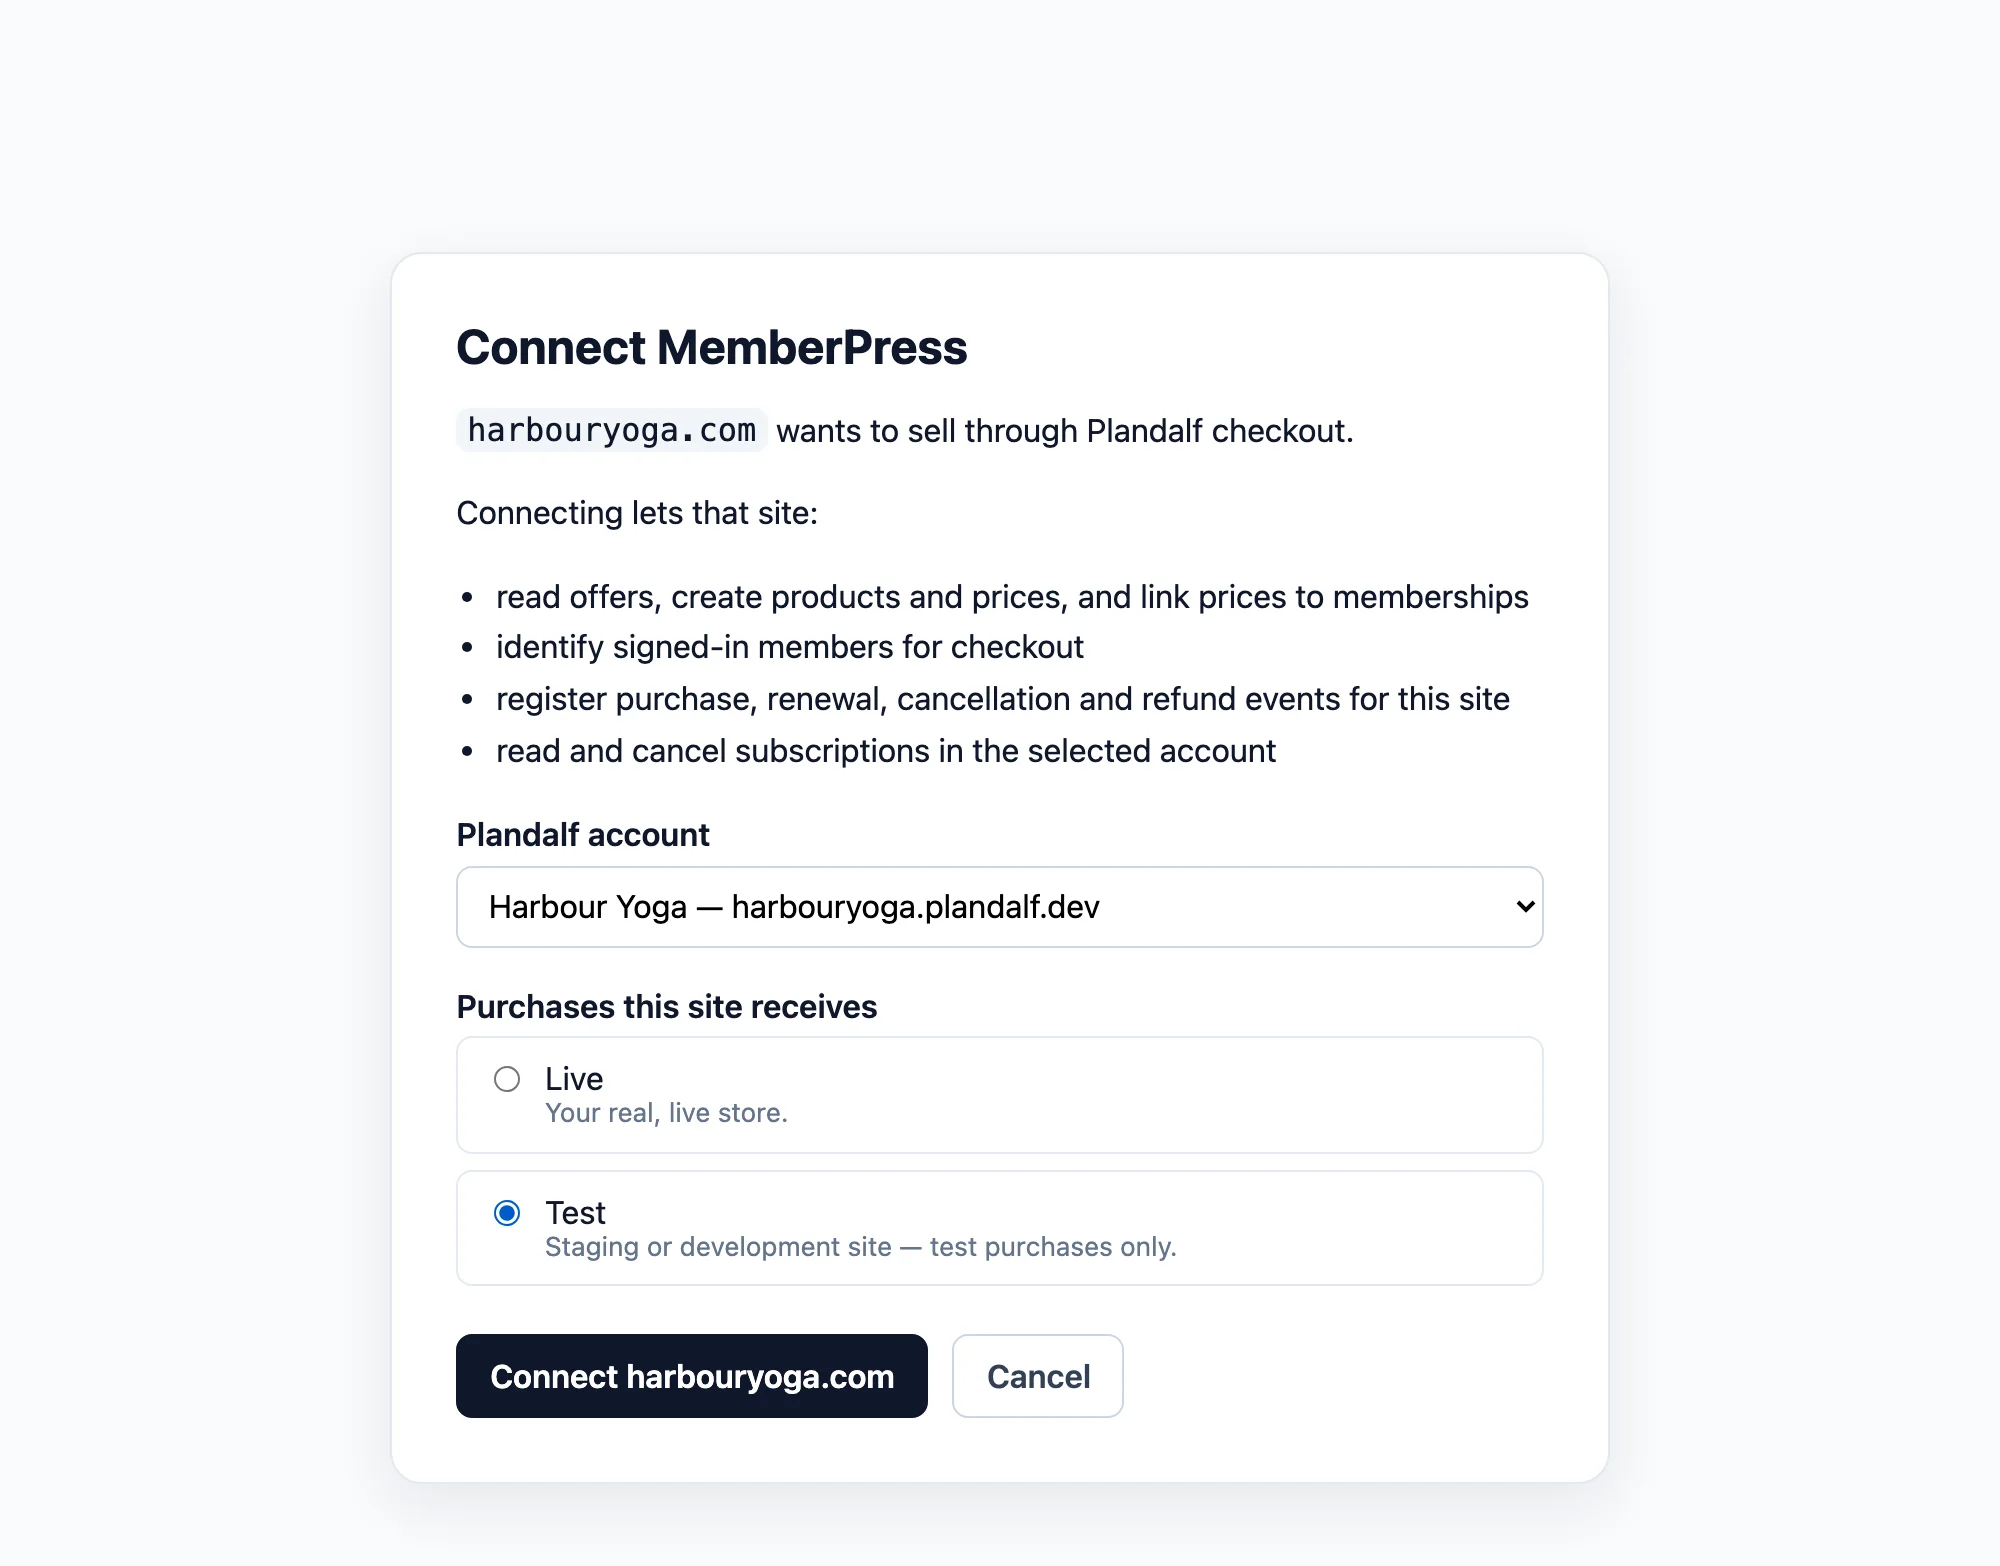 11The Plandalf account to connect22Test for staging, Live for your real site33Connect your site
- 1The Plandalf account to connect
- 2Test for staging, Live for your real site
- 3Connect your site
On Authorize Plandalf, check the account and click Allow access.
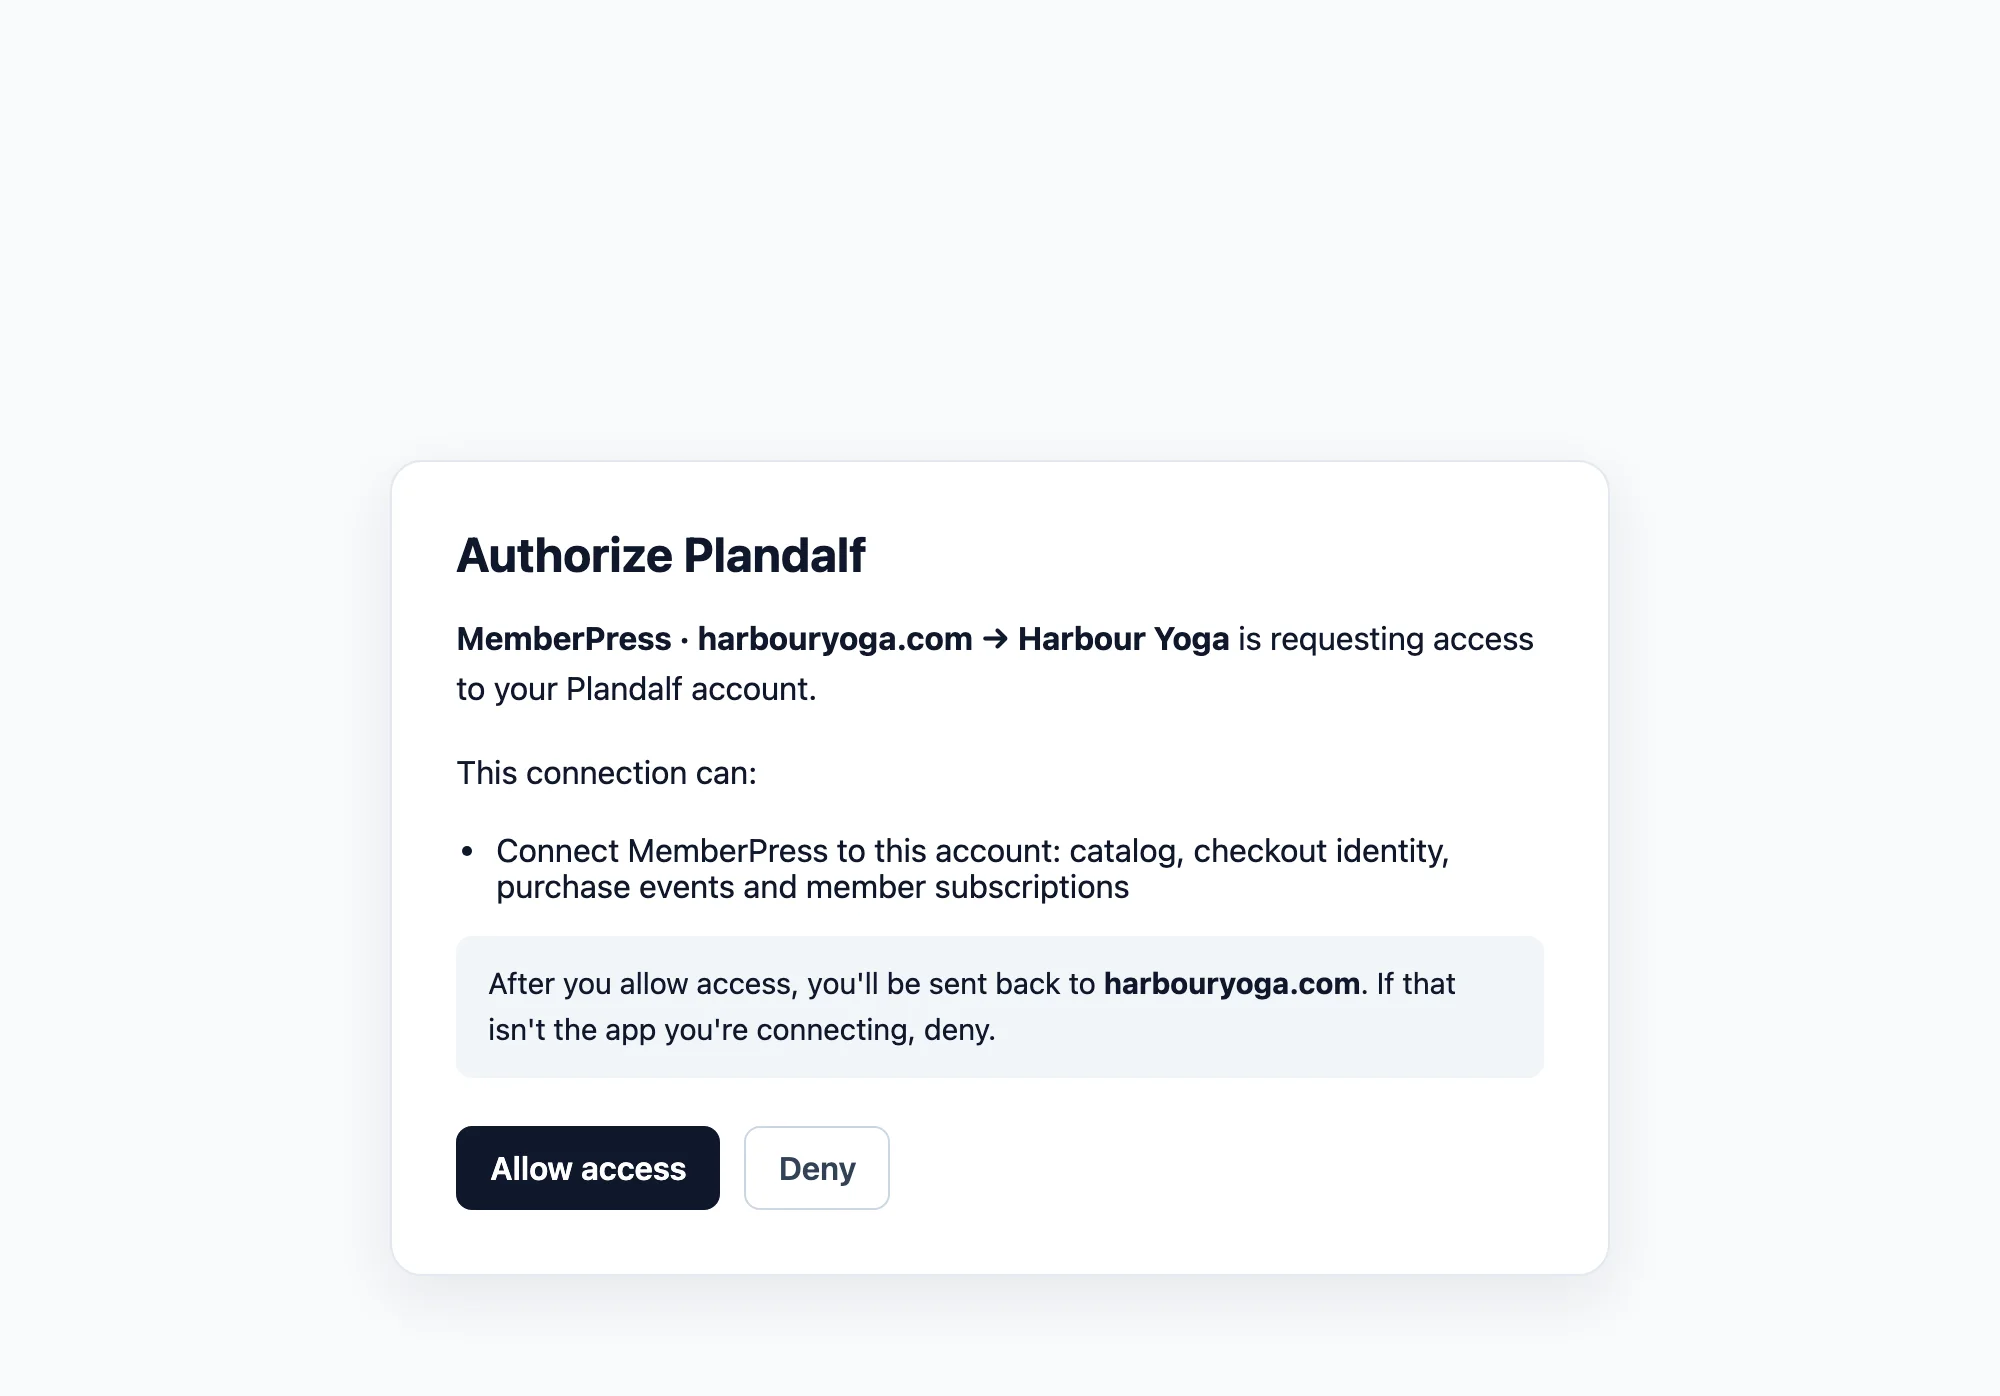 11What the connection can do22Allow access
- 1What the connection can do
- 2Allow access
You’re back in WordPress, connected. There are no keys or webhook addresses to copy: the plugin registered its purchase-event address with Plandalf for you.
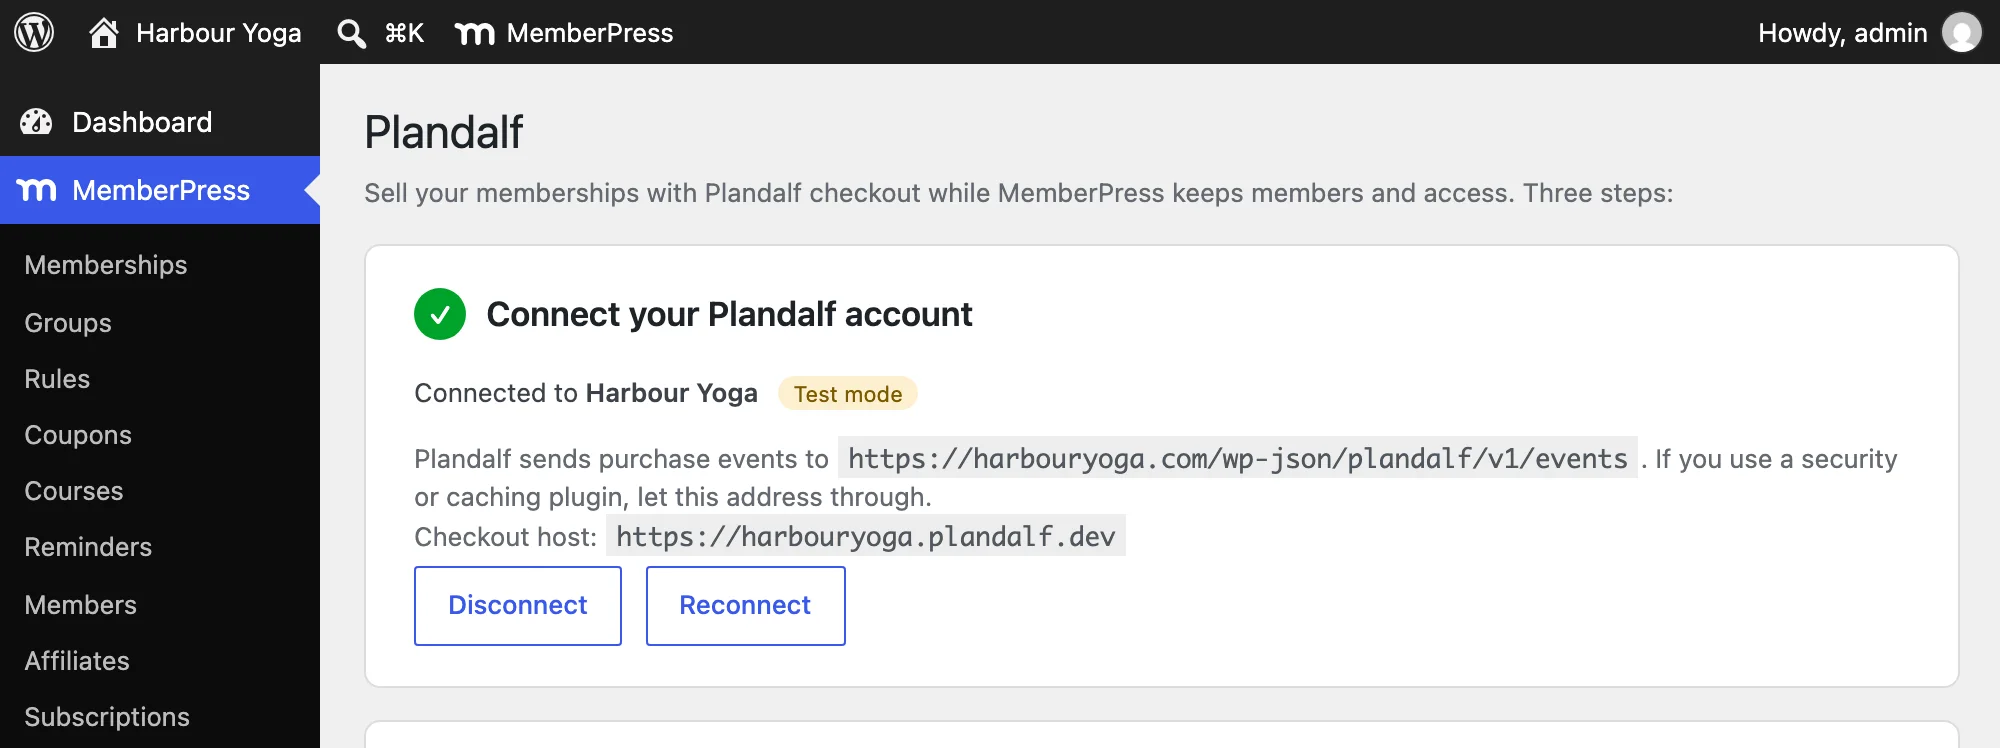 11The connected account and its mode22Where Plandalf sends purchase events33Disconnect, or reconnect to another account
- 1The connected account and its mode
- 2Where Plandalf sends purchase events
- 3Disconnect, or reconnect to another account
If a security or caching plugin protects your site, let /wp-json/plandalf/v1/events through.
4. Choose your checkout and link memberships
Choose the checkout
In step 2, pick the checkout you published, keep Use Plandalf checkout in place of the MemberPress signup form ticked, and click Save checkout.
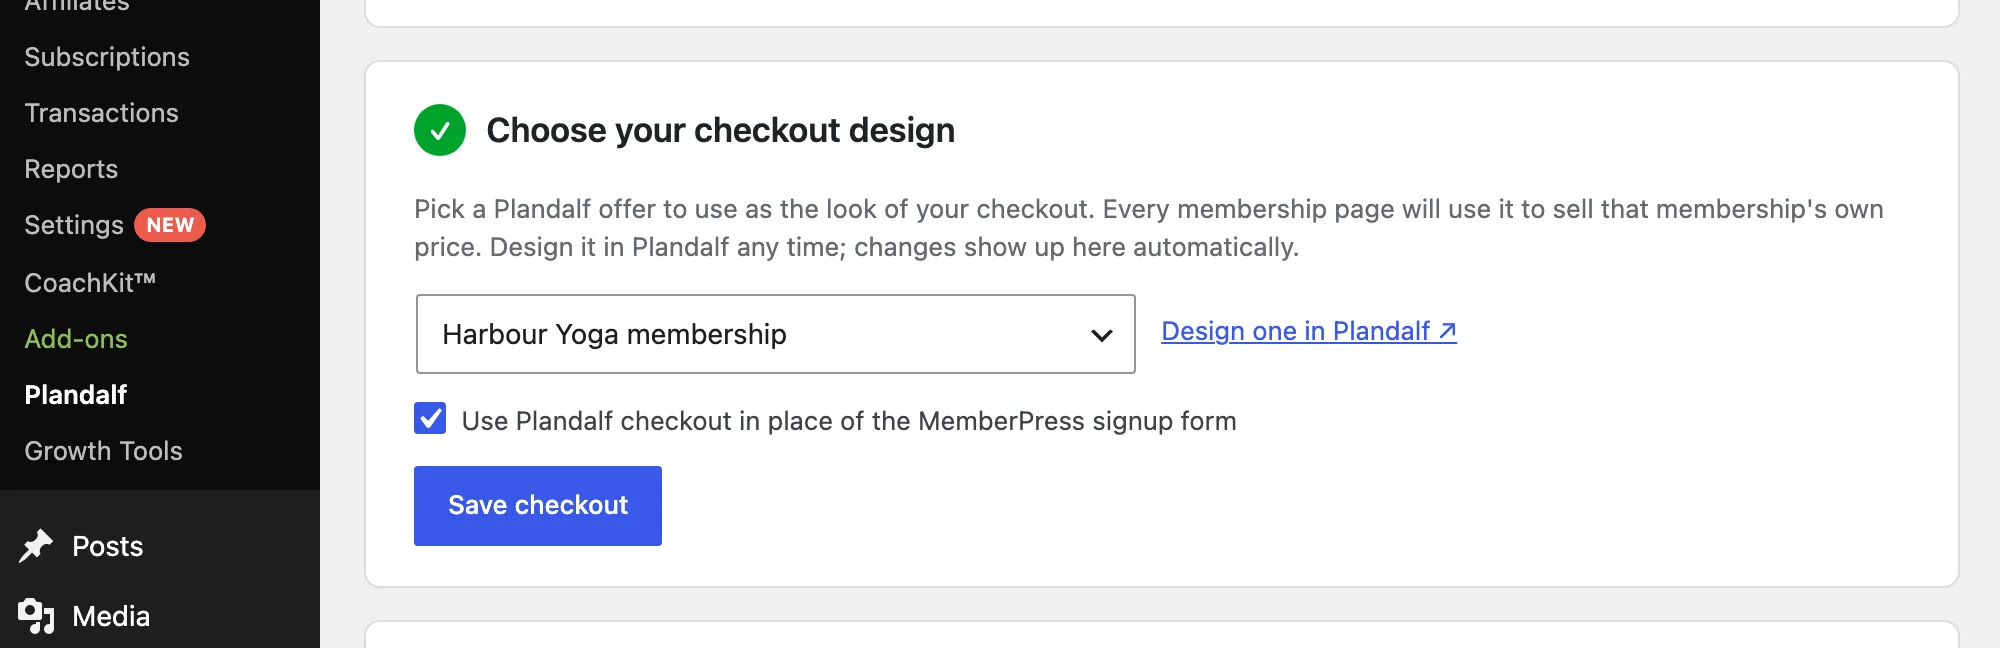 11Your published Plandalf checkout22Use Plandalf in place of the signup form33Save checkout
- 1Your published Plandalf checkout
- 2Use Plandalf in place of the signup form
- 3Save checkout
Link each membership to a price
A membership is what someone gets access to; a Plandalf price is what they pay. Linking them means buying that price grants that membership.
Step 3 lists your memberships. Click Create Plandalf price next to one. The plugin creates a matching price in Plandalf from the membership’s own terms, links them, and the membership page switches to your checkout straight away.
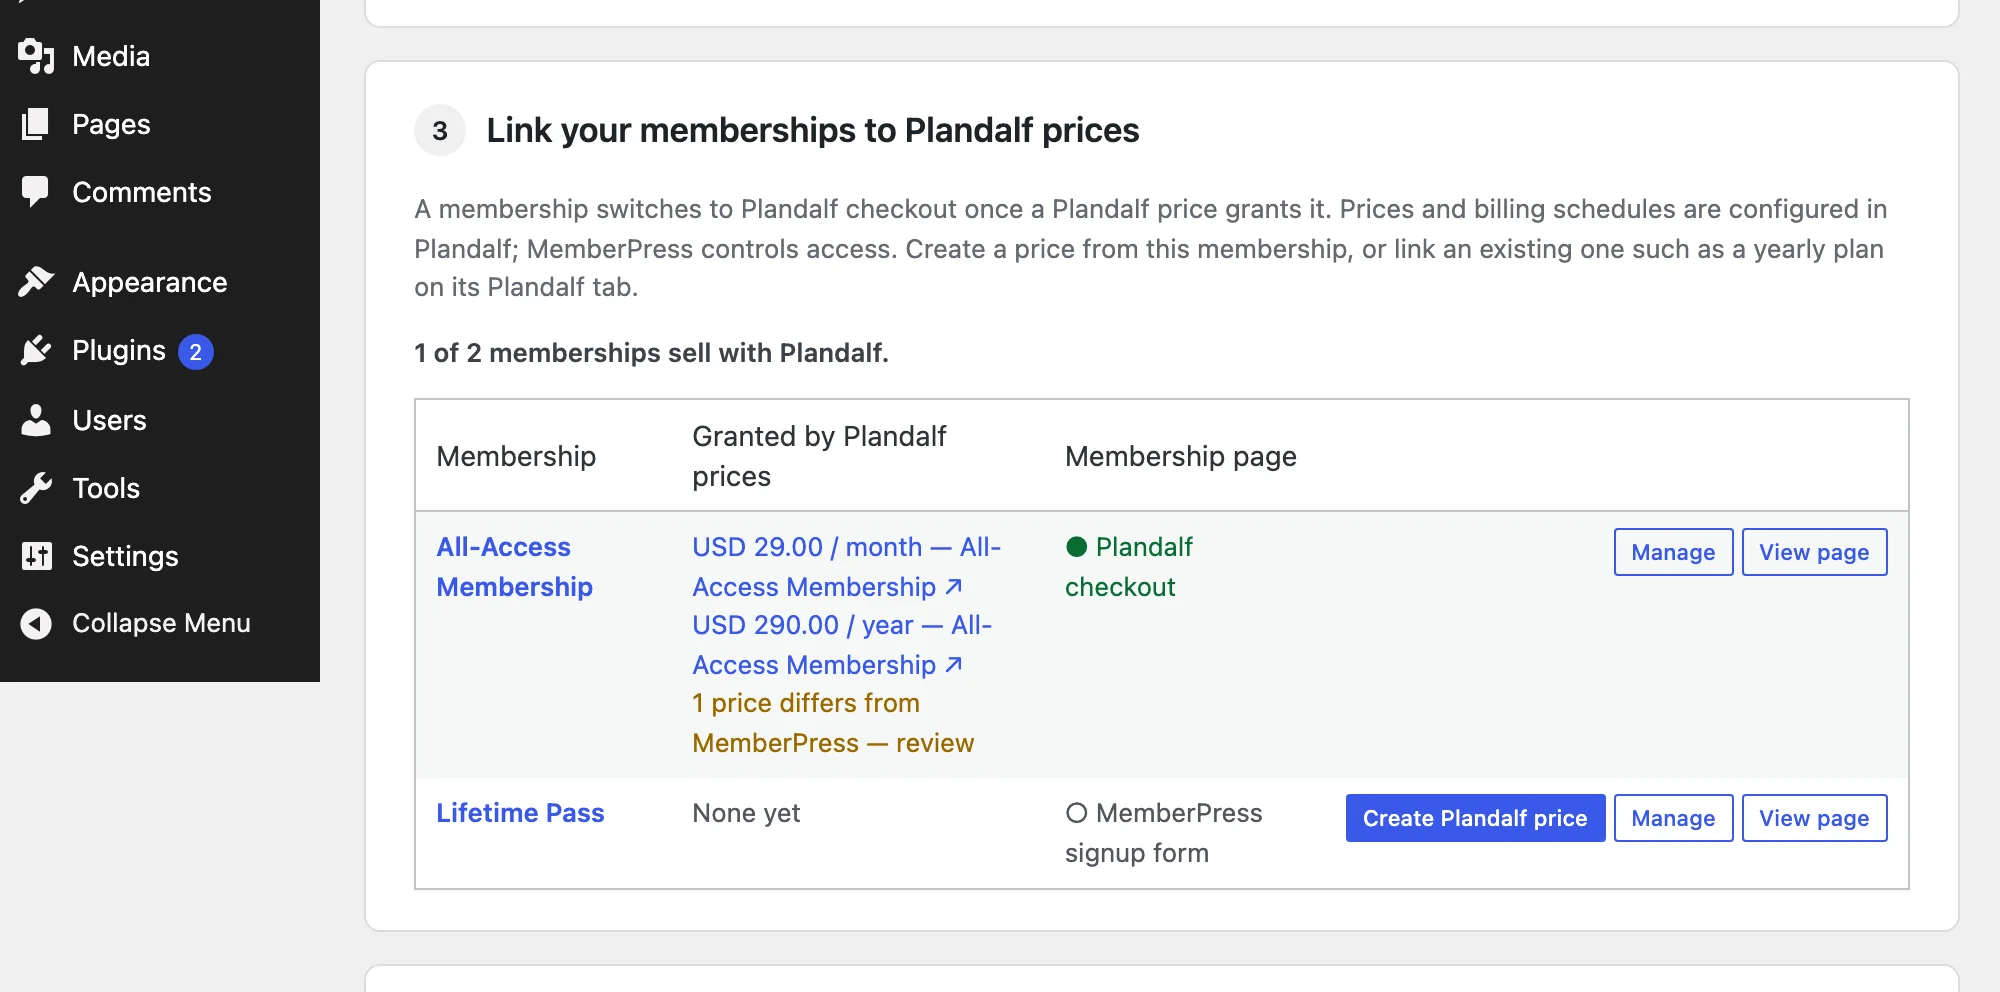 11Prices that grant All-Access Membership22Its page shows the Plandalf checkout33Lifetime Pass isn’t linked yet44Create Plandalf price links it
- 1Prices that grant All-Access Membership
- 2Its page shows the Plandalf checkout
- 3Lifetime Pass isn’t linked yet
- 4Create Plandalf price links it
Fine-tune a membership
Click Manage to open the membership’s Plandalf tab. Here you can link more prices to the same membership, such as a yearly plan, and see when a price differs from the membership’s own terms. Click Update MemberPress to match Plandalf to copy the price across, or Keep the difference if it’s on purpose.
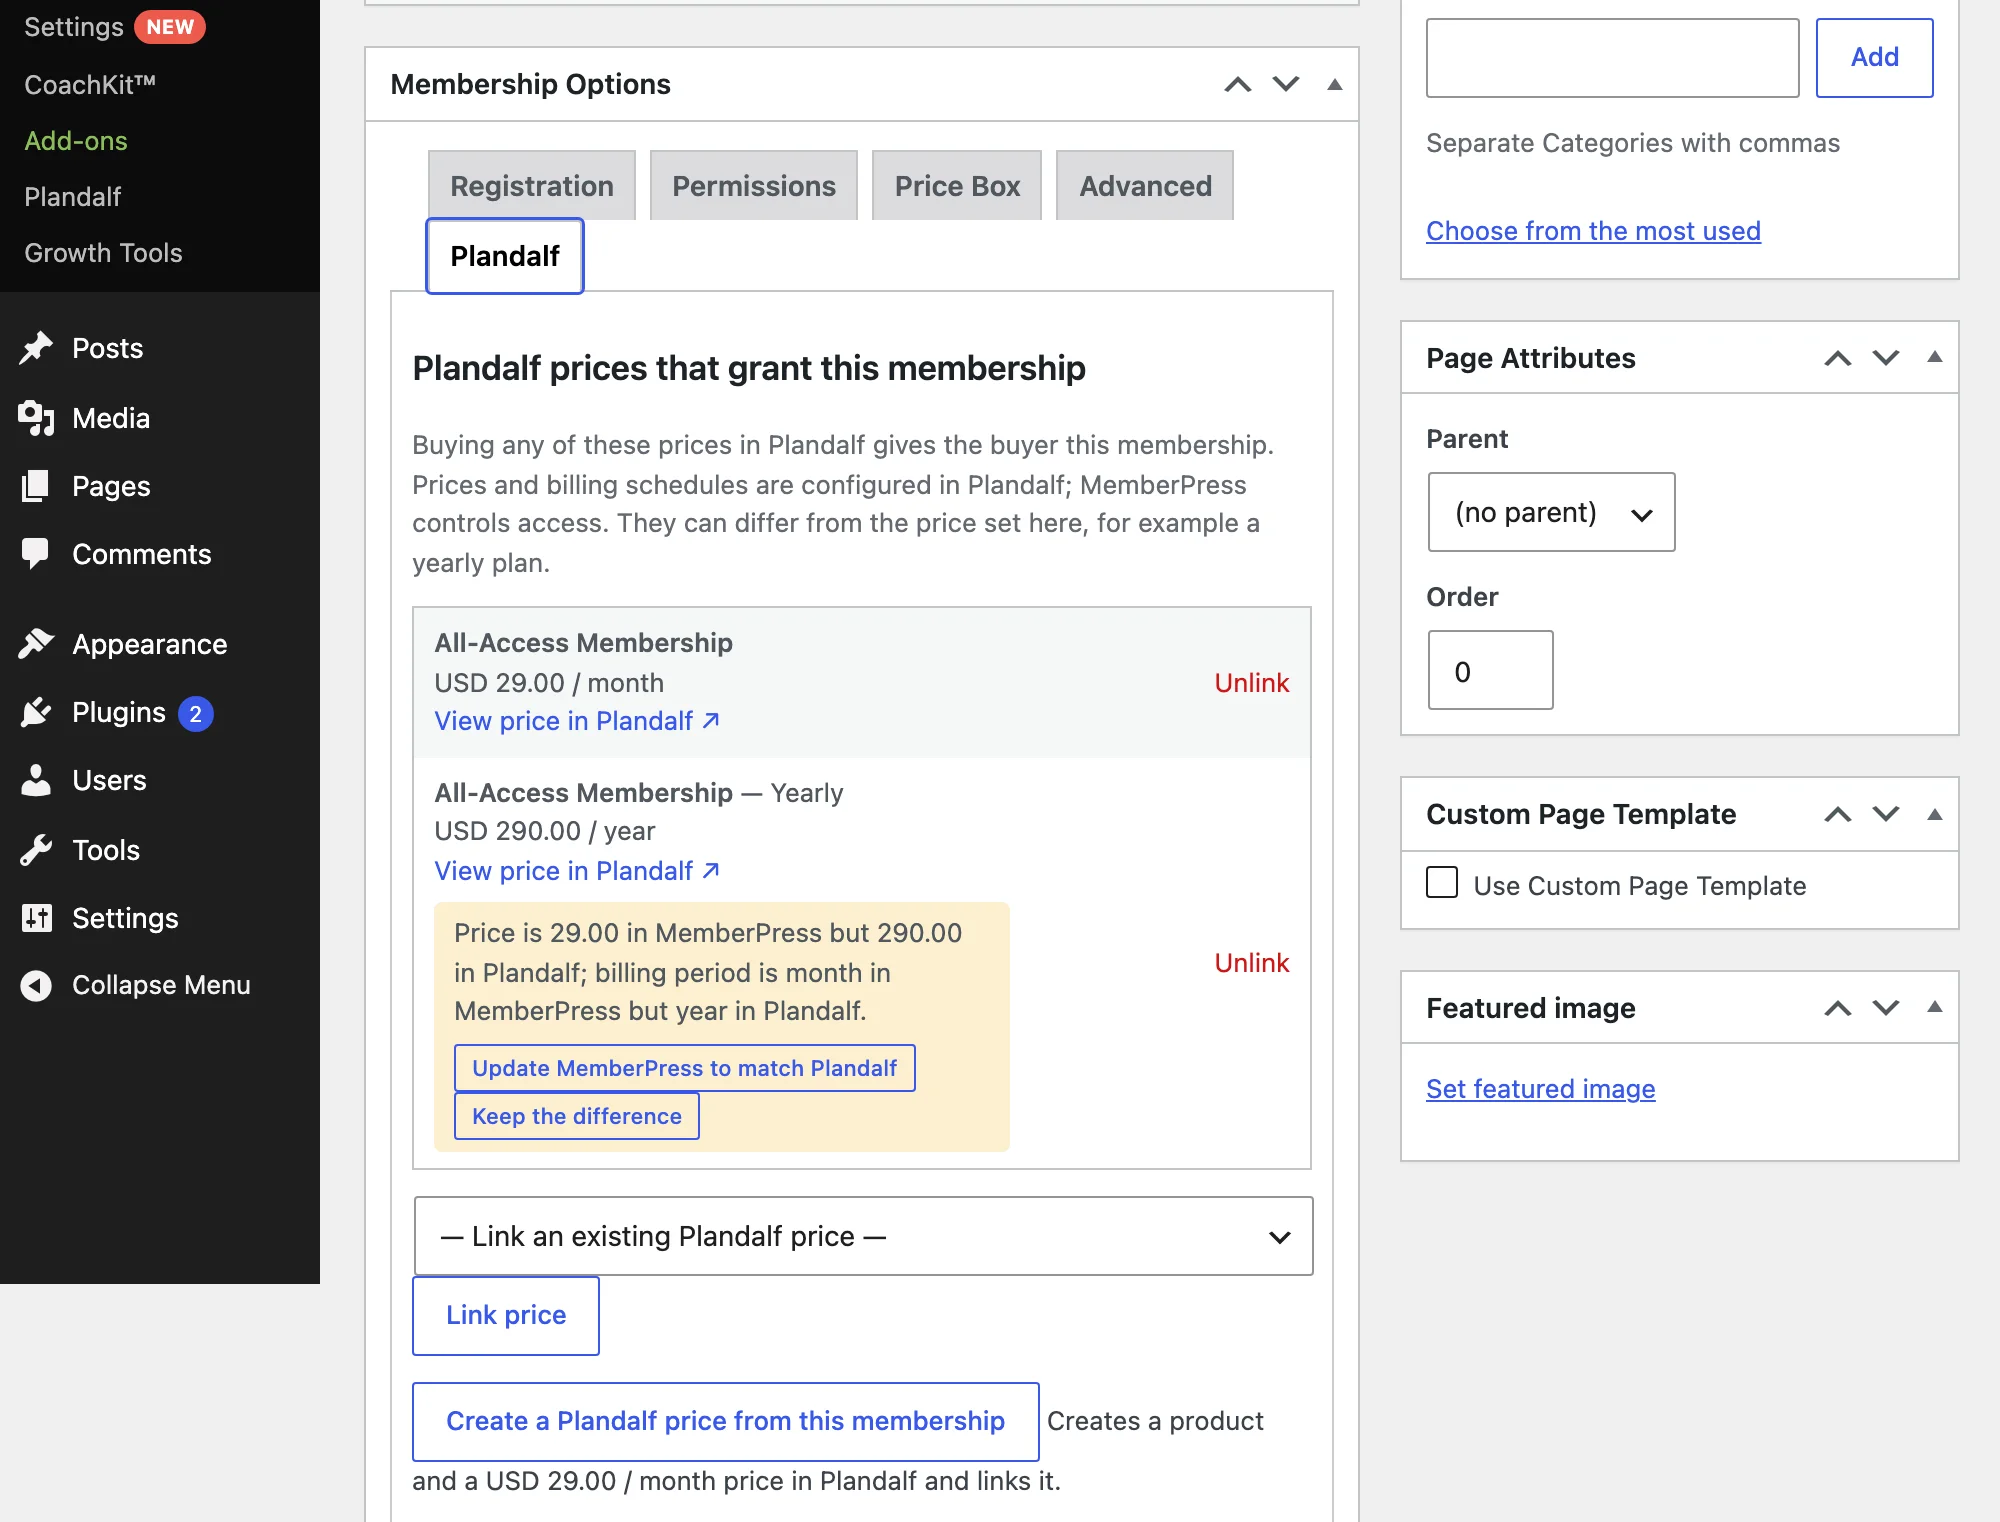 11The Plandalf tab22A price that grants this membership33This price differs from MemberPress44Pick an existing Plandalf price, then Link price55Or create one from this membership
- 1The Plandalf tab
- 2A price that grants this membership
- 3This price differs from MemberPress
- 4Pick an existing Plandalf price, then Link price
- 5Or create one from this membership
Further down, choose how the page sells: which price, which checkout design, and whether the checkout is embedded in the page or opens from a button.
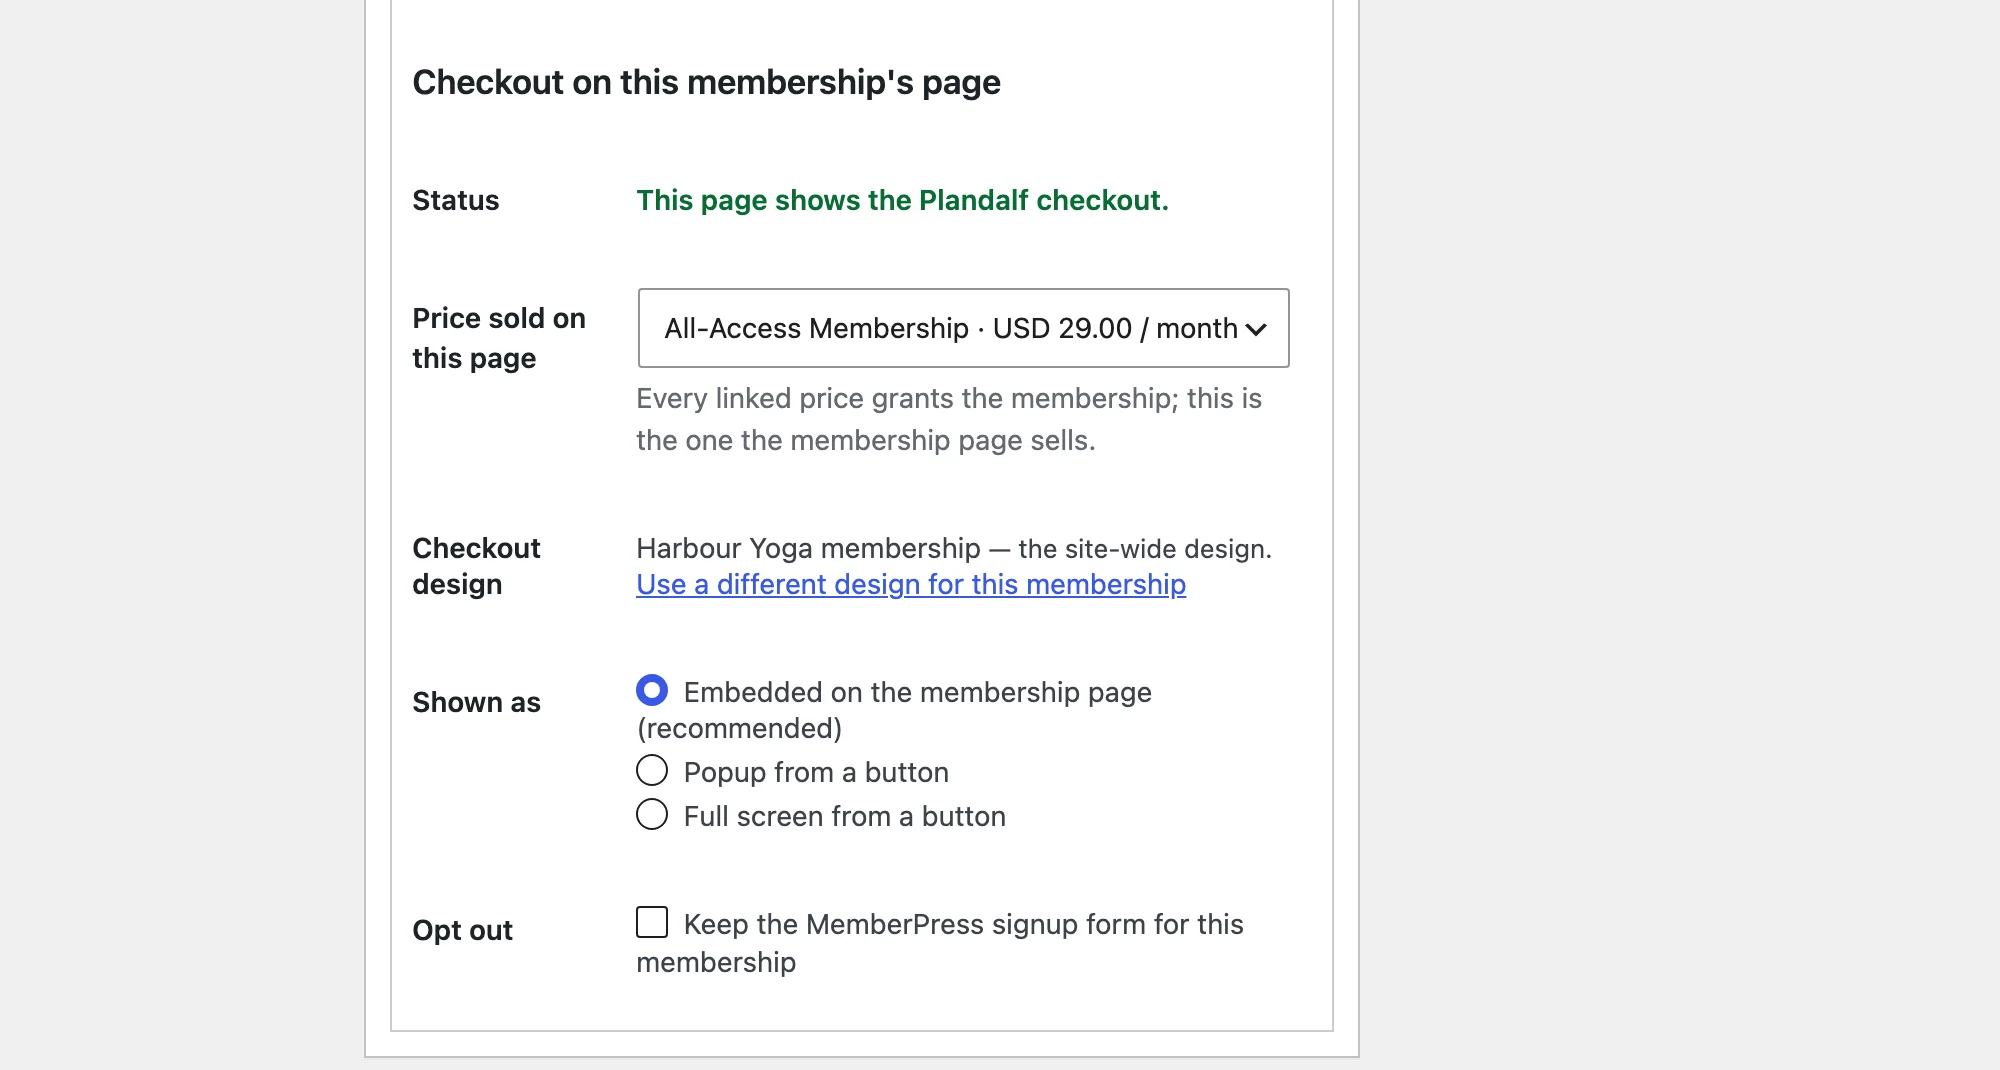 11Whether the page shows the Plandalf checkout, and why not22The price this page sells33Use a different checkout design here44Embedded, popup or full screen55Keep the MemberPress signup form instead
- 1Whether the page shows the Plandalf checkout, and why not
- 2The price this page sells
- 3Use a different checkout design here
- 4Embedded, popup or full screen
- 5Keep the MemberPress signup form instead
To sell a membership from another page, add a button with its membership ID (the number in the membership’s edit link):
[plandalf_buy membership="9"]Join now[/plandalf_buy]5. Protect your content
Plandalf grants the membership; MemberPress rules decide what it unlocks. If your content is already protected, skip ahead. Otherwise, make a test page with a sentence you’ll recognise, then go to MemberPress → Rules → Add New Rule.
Choose A Single Page, pick your page, set the access condition to your membership and click Save Rule.
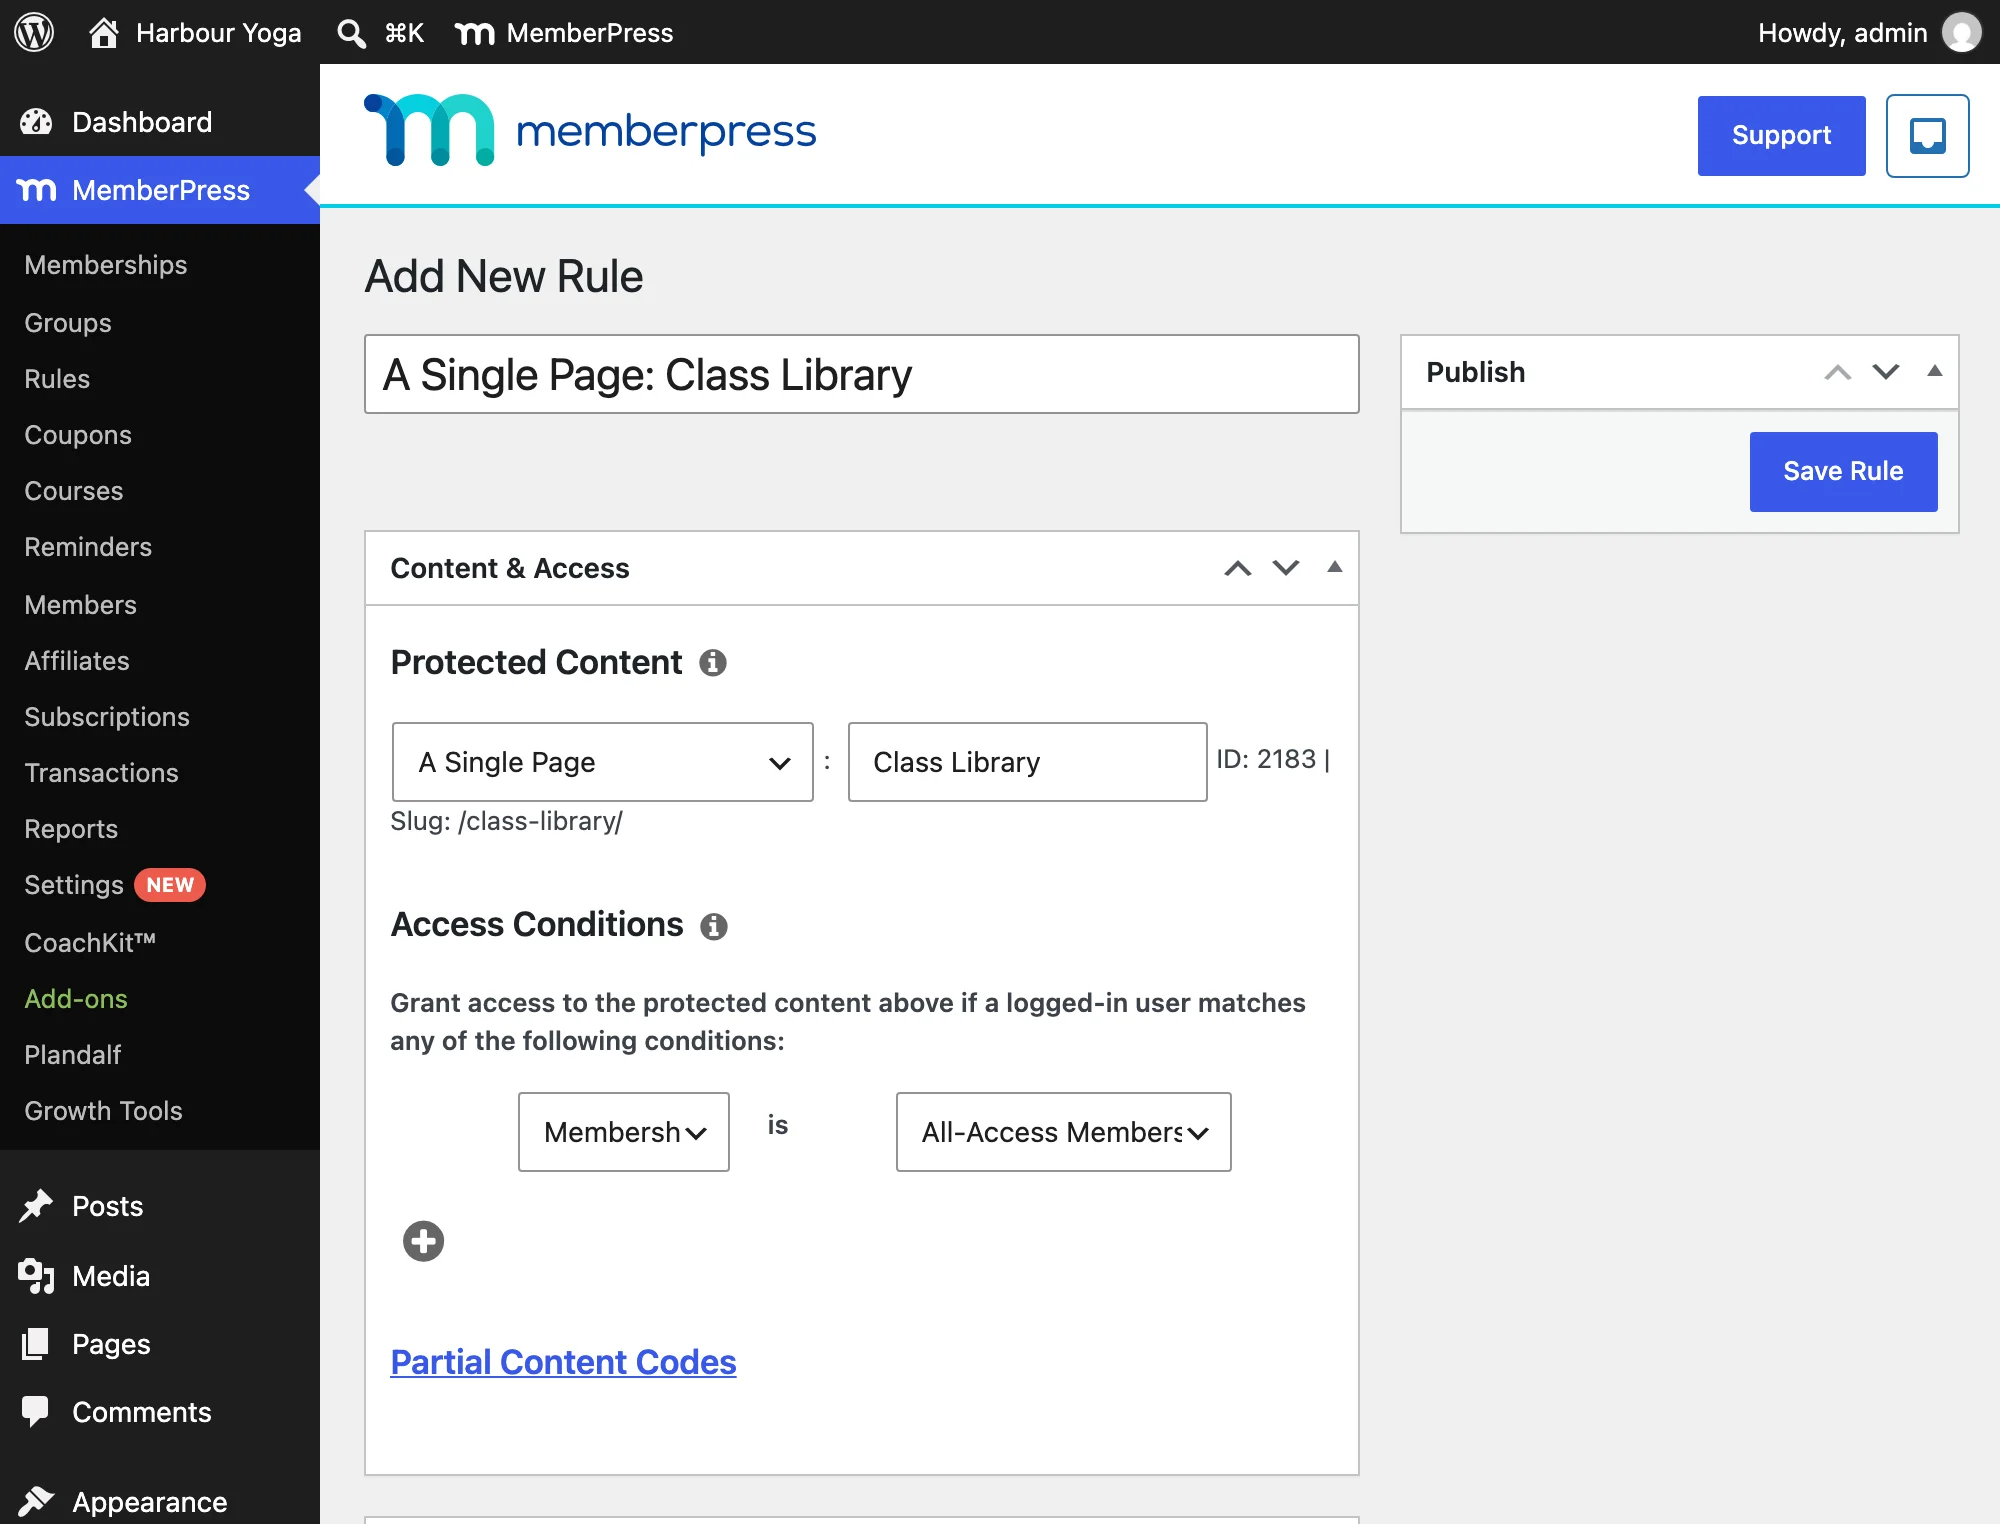 11Protect A Single Page22Pick the page by its title33Membership is All-Access Membership44Save Rule
- 1Protect A Single Page
- 2Pick the page by its title
- 3Membership is All-Access Membership
- 4Save Rule
Then tell MemberPress where new members should land. In the membership, open Membership Options → Advanced and set Membership Access URL to the page.
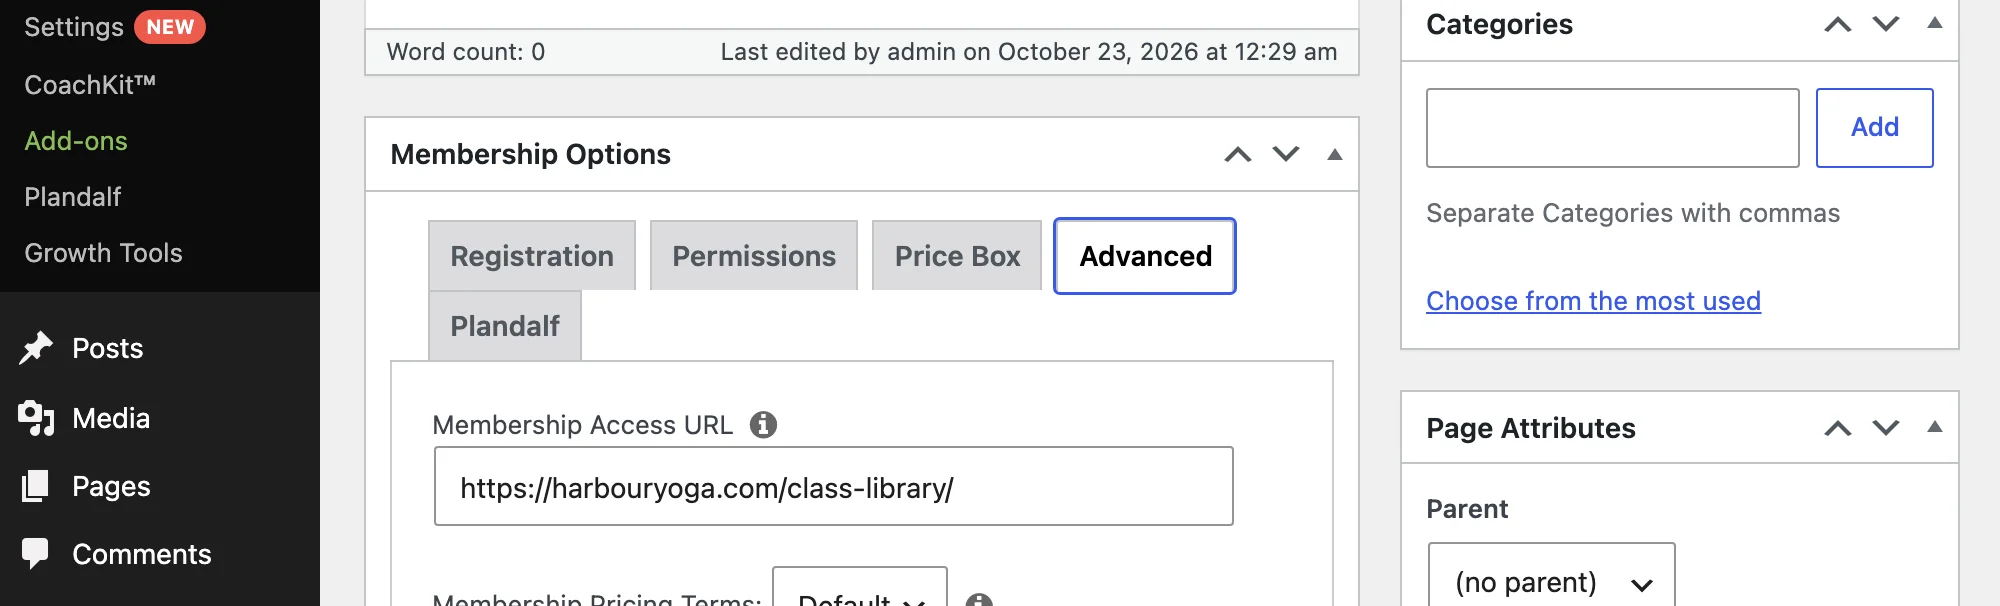 11The Advanced tab22Where members land after signing up
- 1The Advanced tab
- 2Where members land after signing up
Log out and open the page. It should be locked. (Administrators skip rules, so always check signed out.)
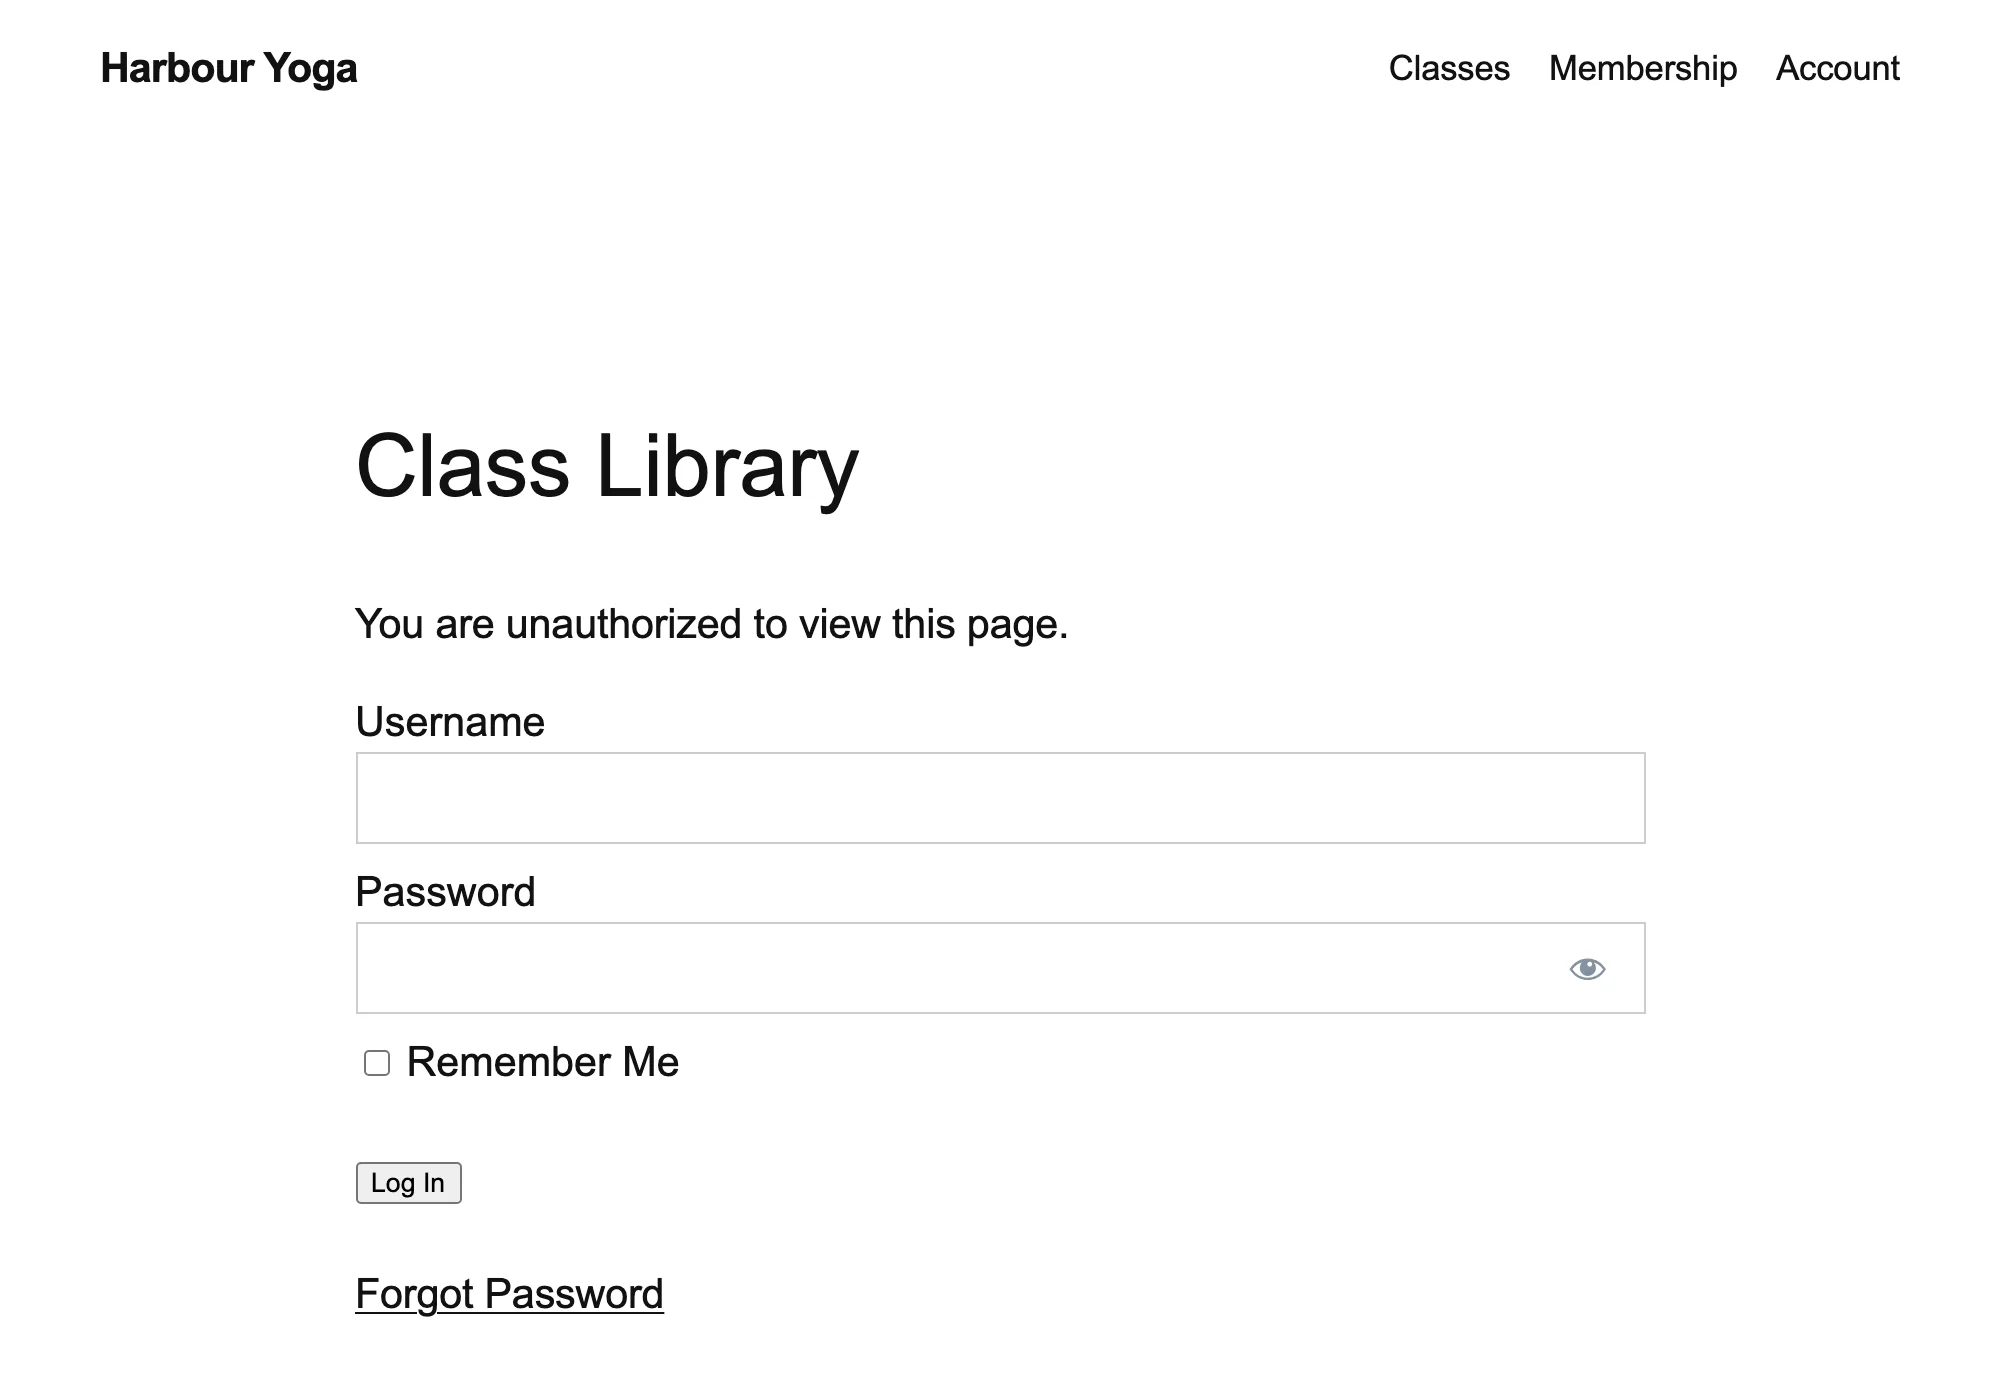 11MemberPress blocks visitors
- 1MemberPress blocks visitors
6. Make a test purchase
Open the membership page in a private window. Your checkout sits where the signup form was, and in test mode a banner reminds you which card to use.
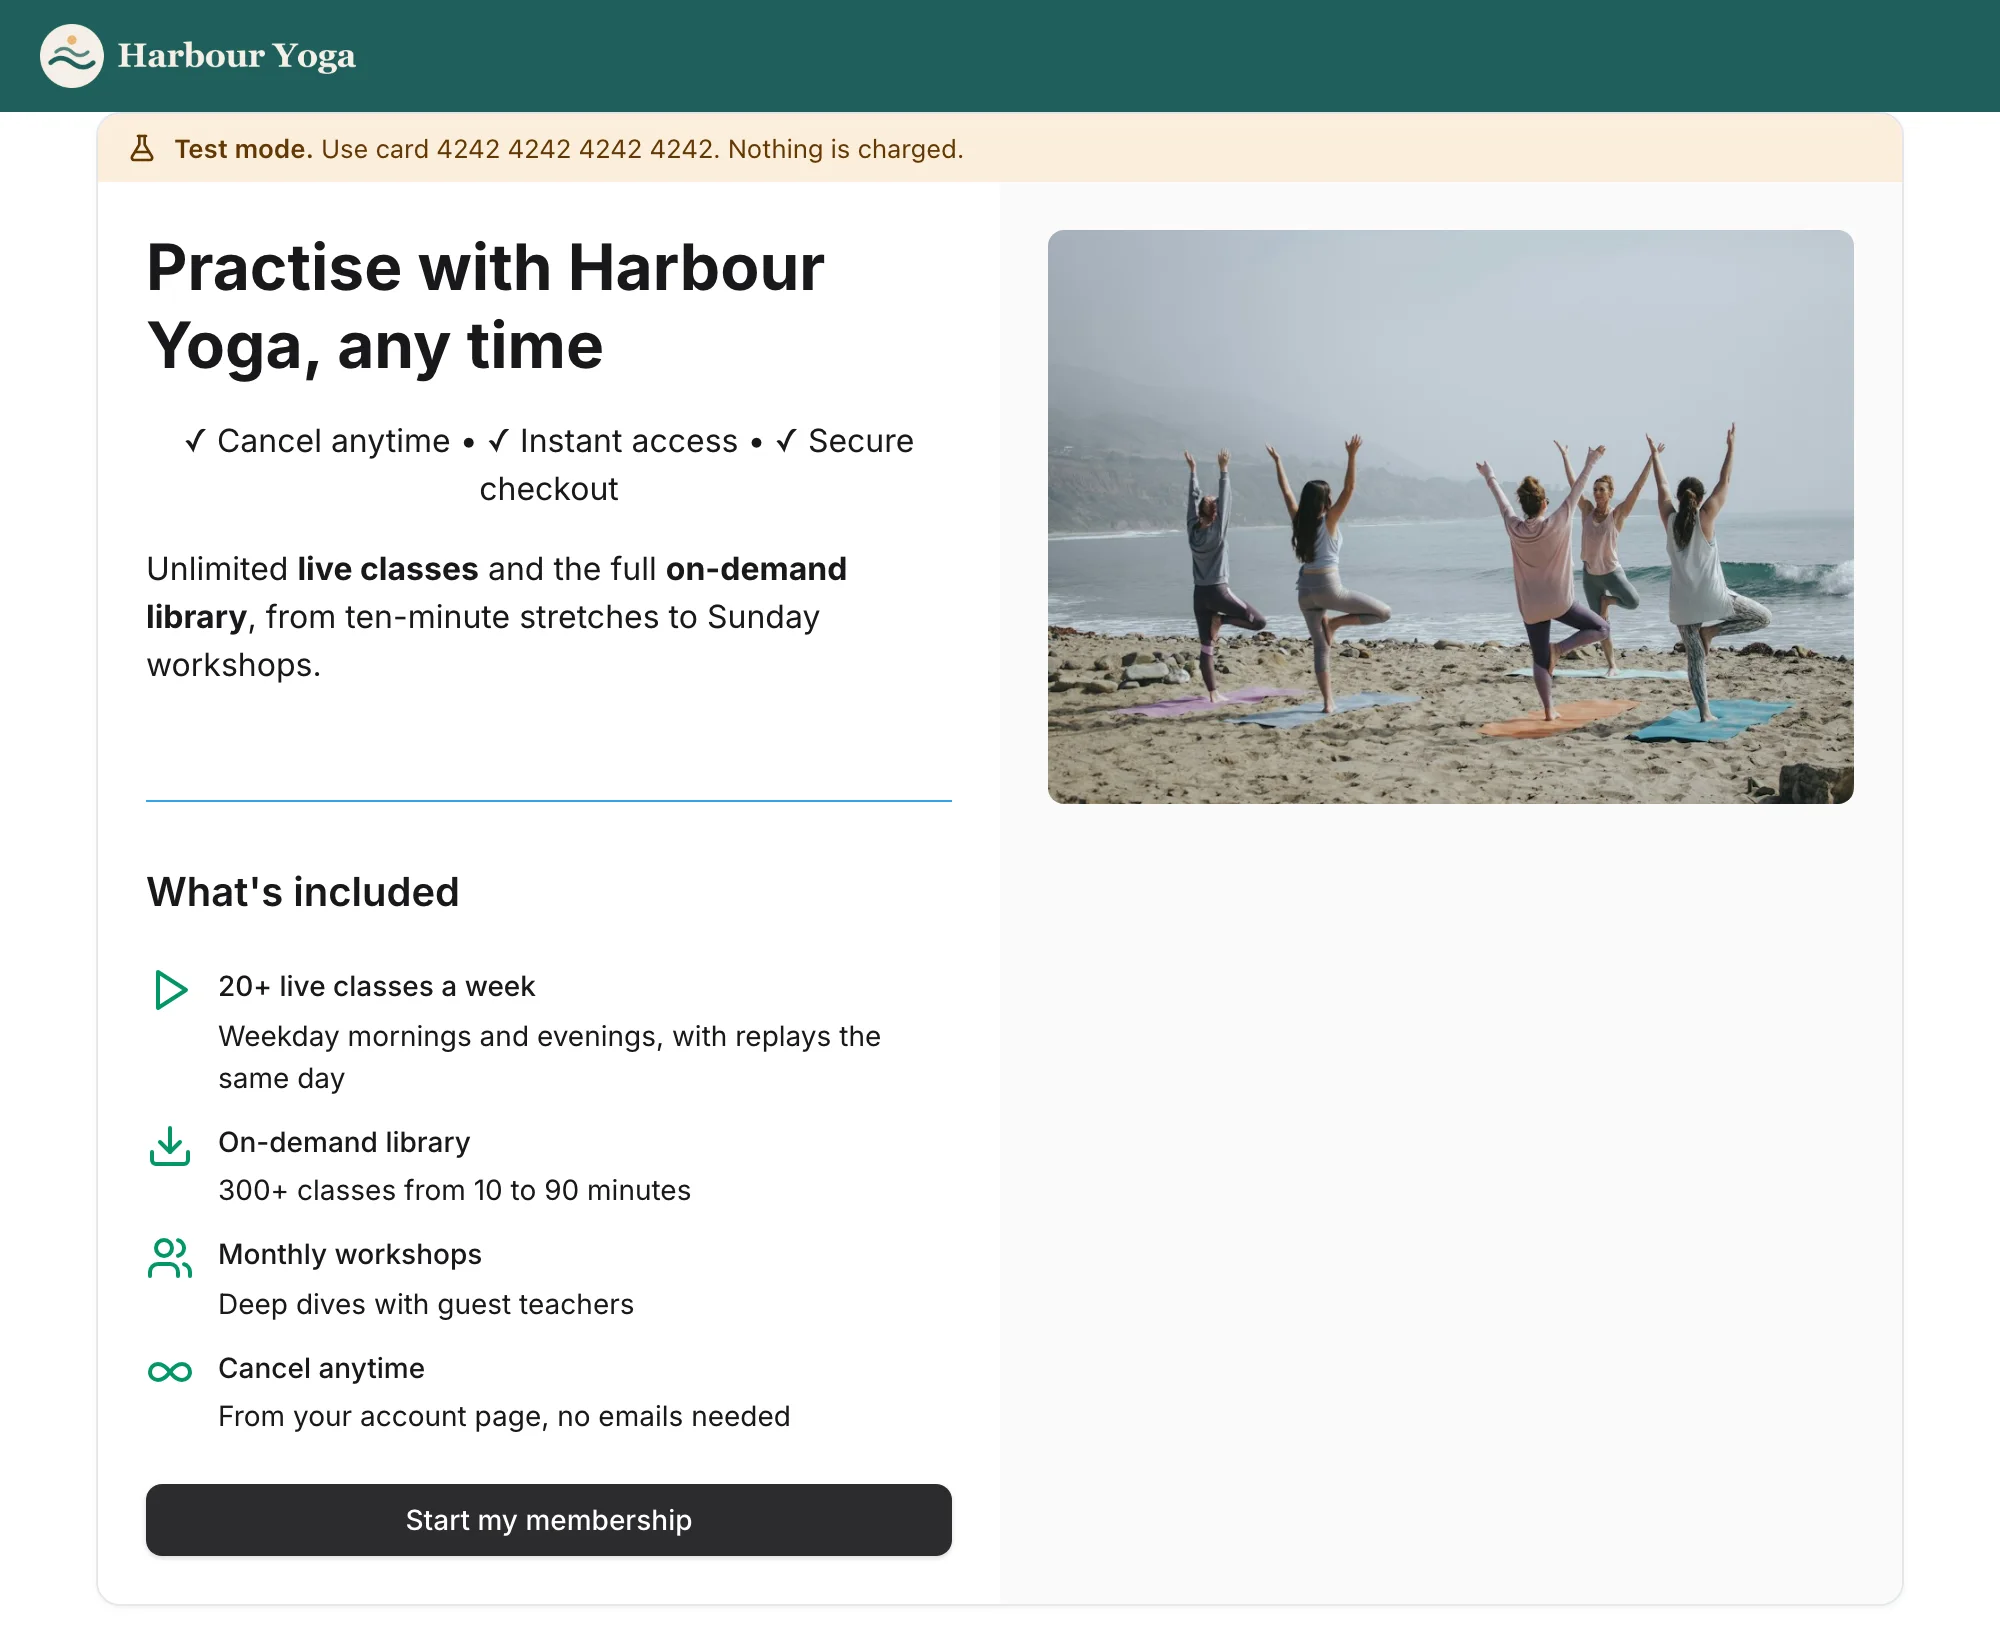 11Test mode: use card 4242 4242 4242 4242, nothing is charged22Your checkout design, where the signup form was33The buyer starts here
- 1Test mode: use card 4242 4242 4242 4242, nothing is charged
- 2Your checkout design, where the signup form was
- 3The buyer starts here
Pay with a new email address you can read and the test card 4242 4242 4242 4242, any future date and any CVC.
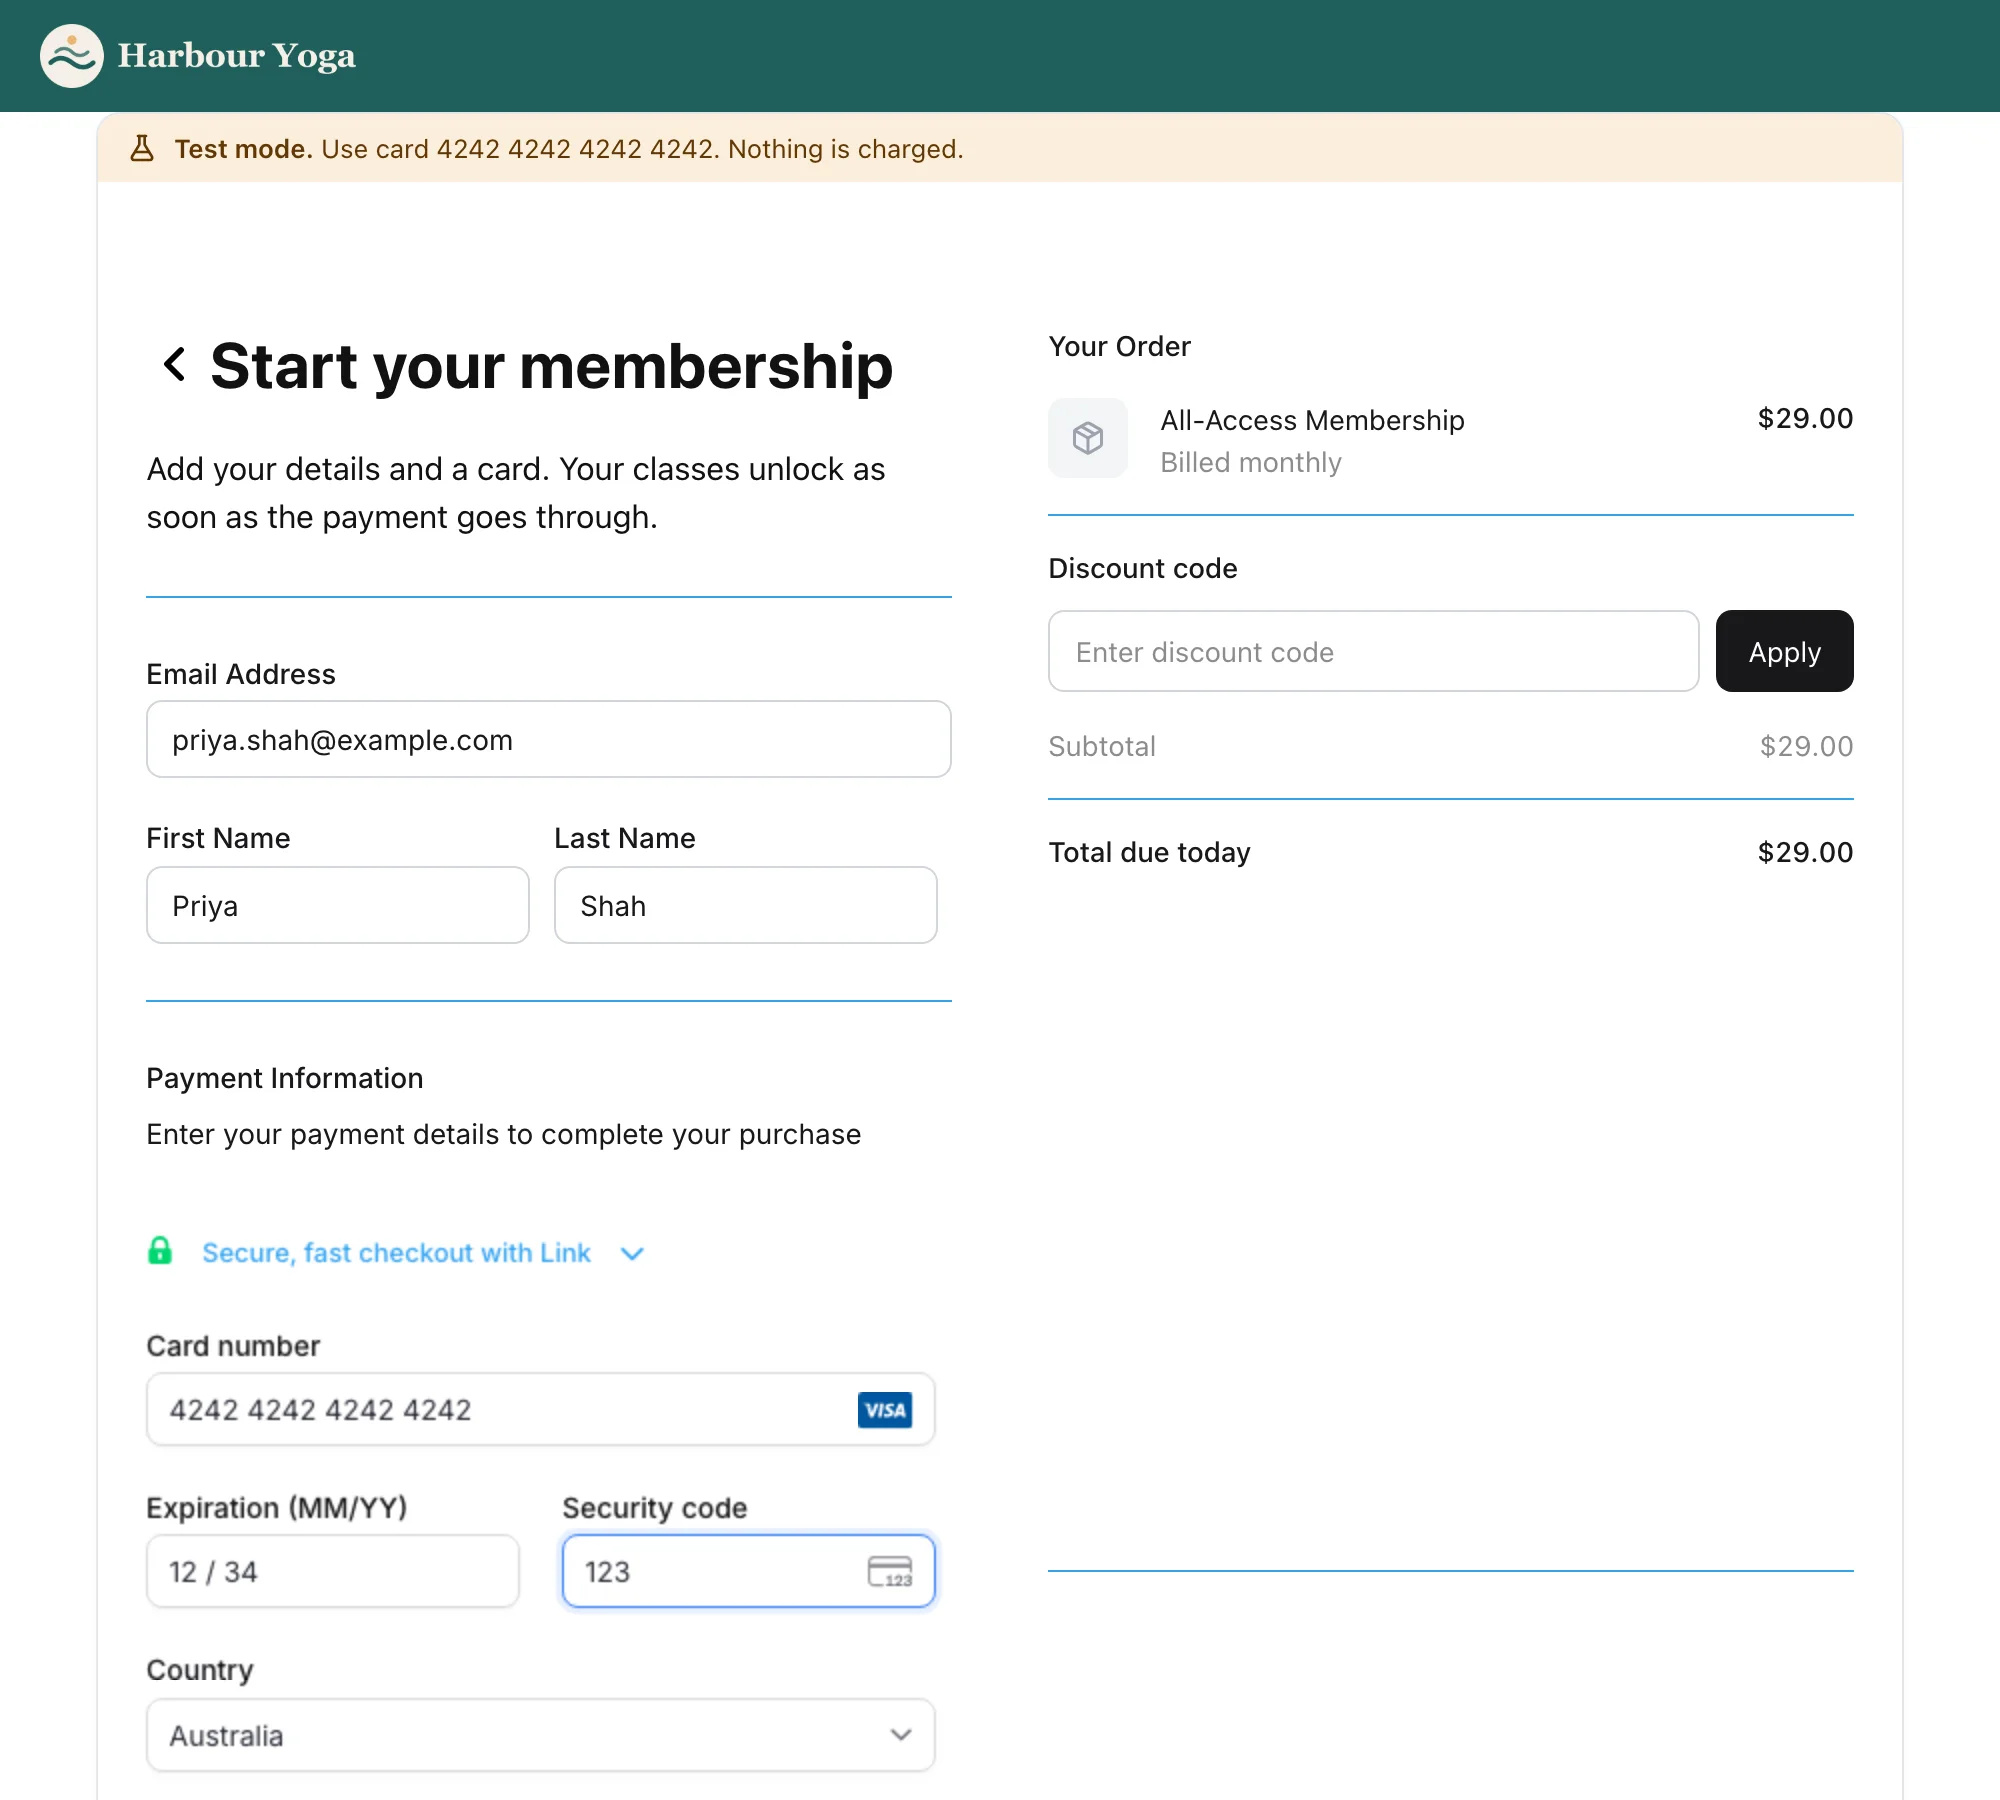 11Email: the membership goes to this account22Card details, handled by Stripe33The membership and its price
- 1Email: the membership goes to this account
- 2Card details, handled by Stripe
- 3The membership and its price
The thank-you page waits a moment while Plandalf confirms the payment.
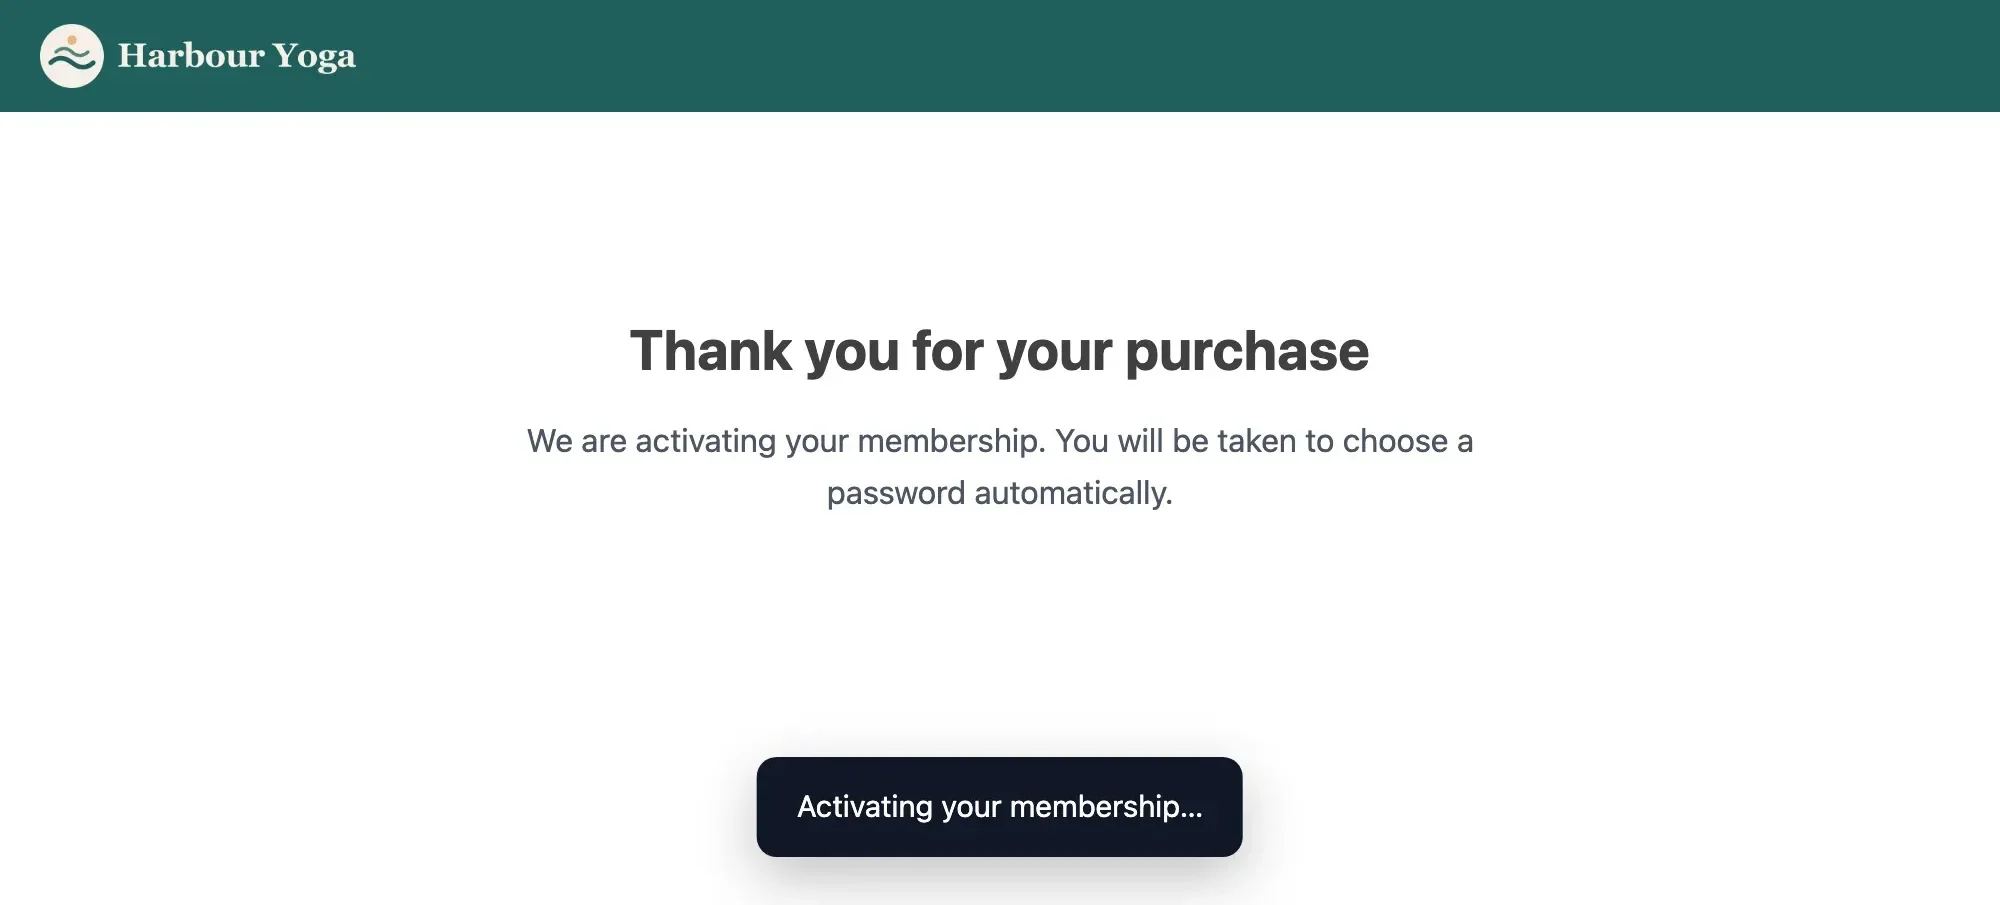 11The page waits for Plandalf to confirm the payment22Then it moves on by itself
- 1The page waits for Plandalf to confirm the payment
- 2Then it moves on by itself
A new member is then asked to choose a password. The same link arrives by email, in case they close the page. Someone already signed in just sees their membership confirmed.
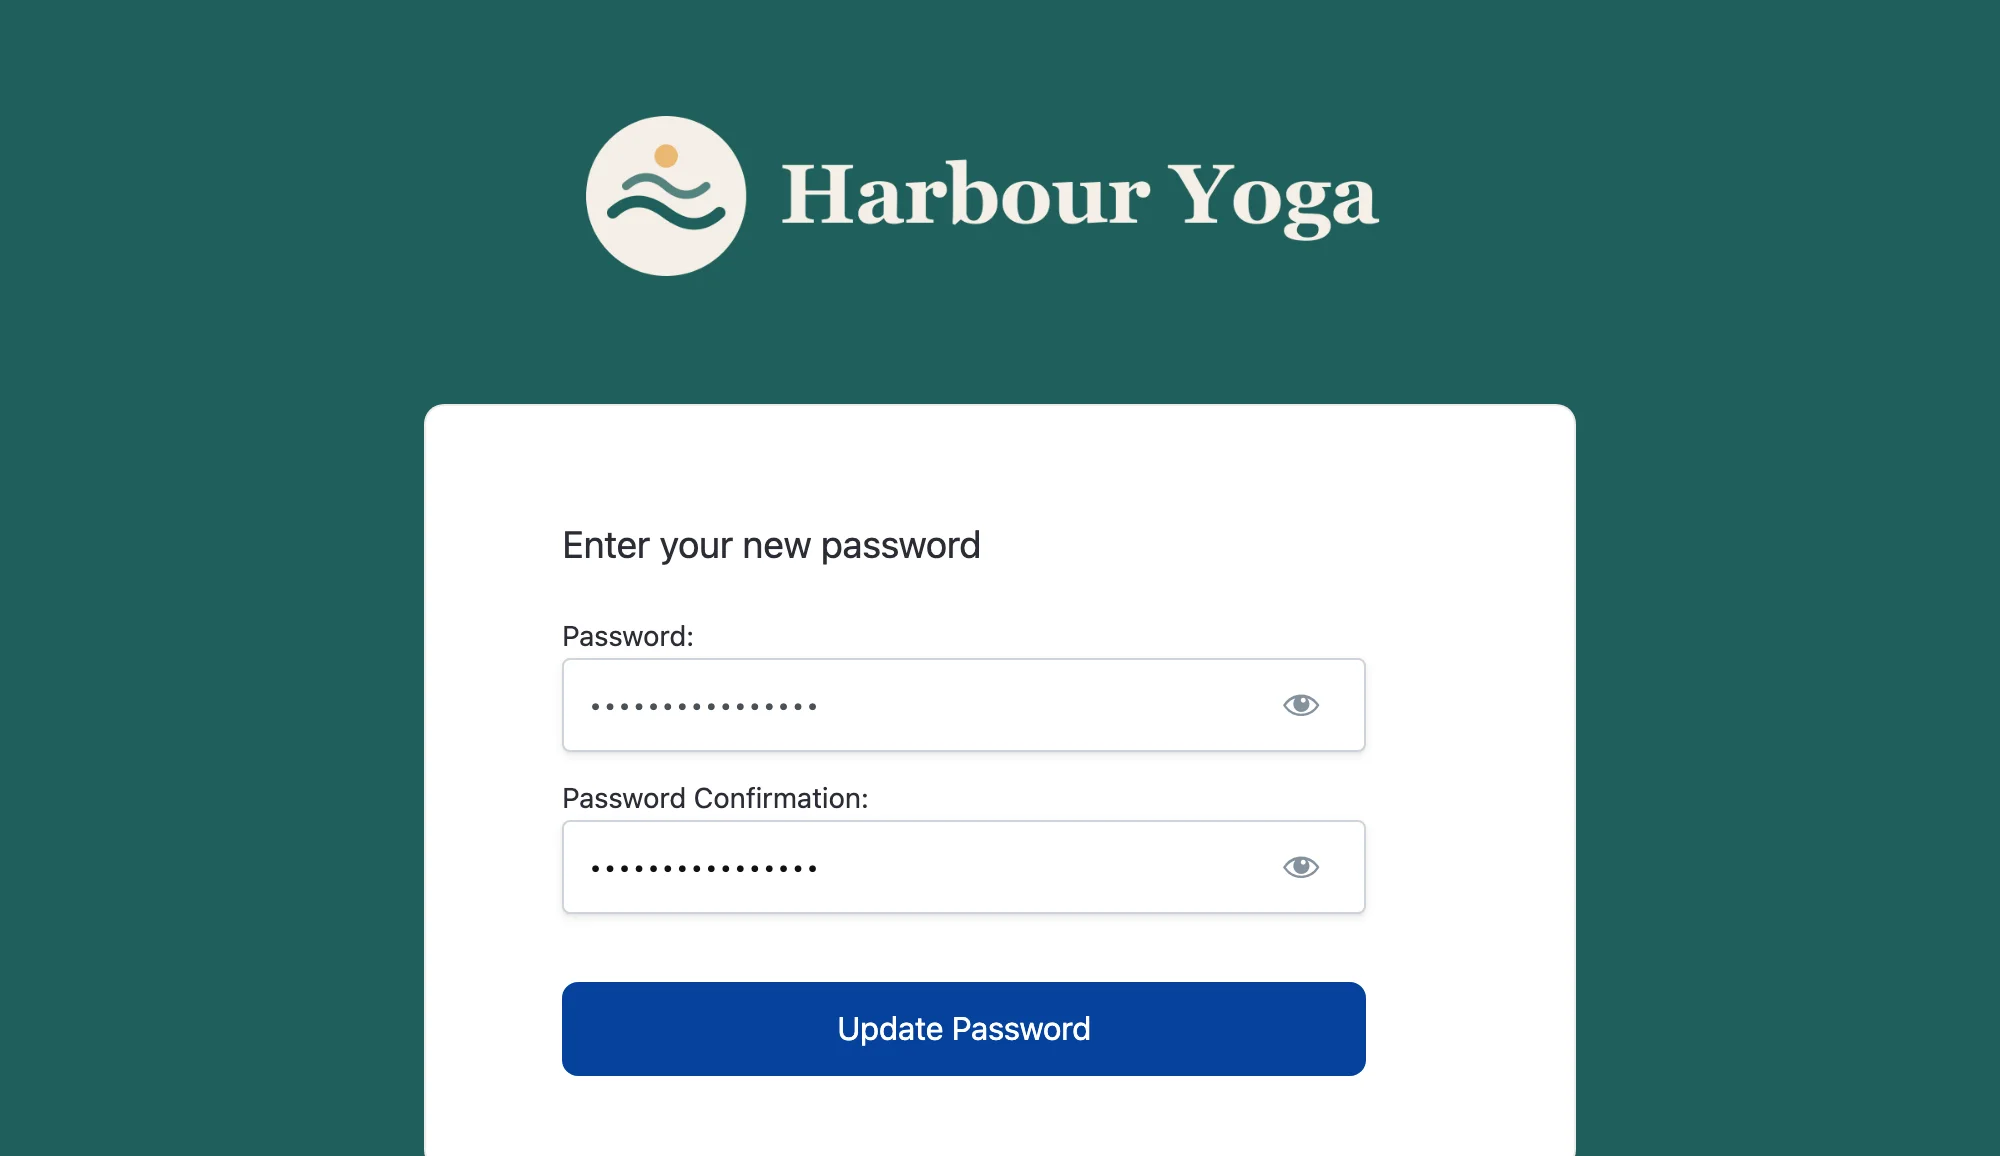 11They choose a password22Then they are signed in
- 1They choose a password
- 2Then they are signed in
Once they’ve set it, the protected page opens for them.
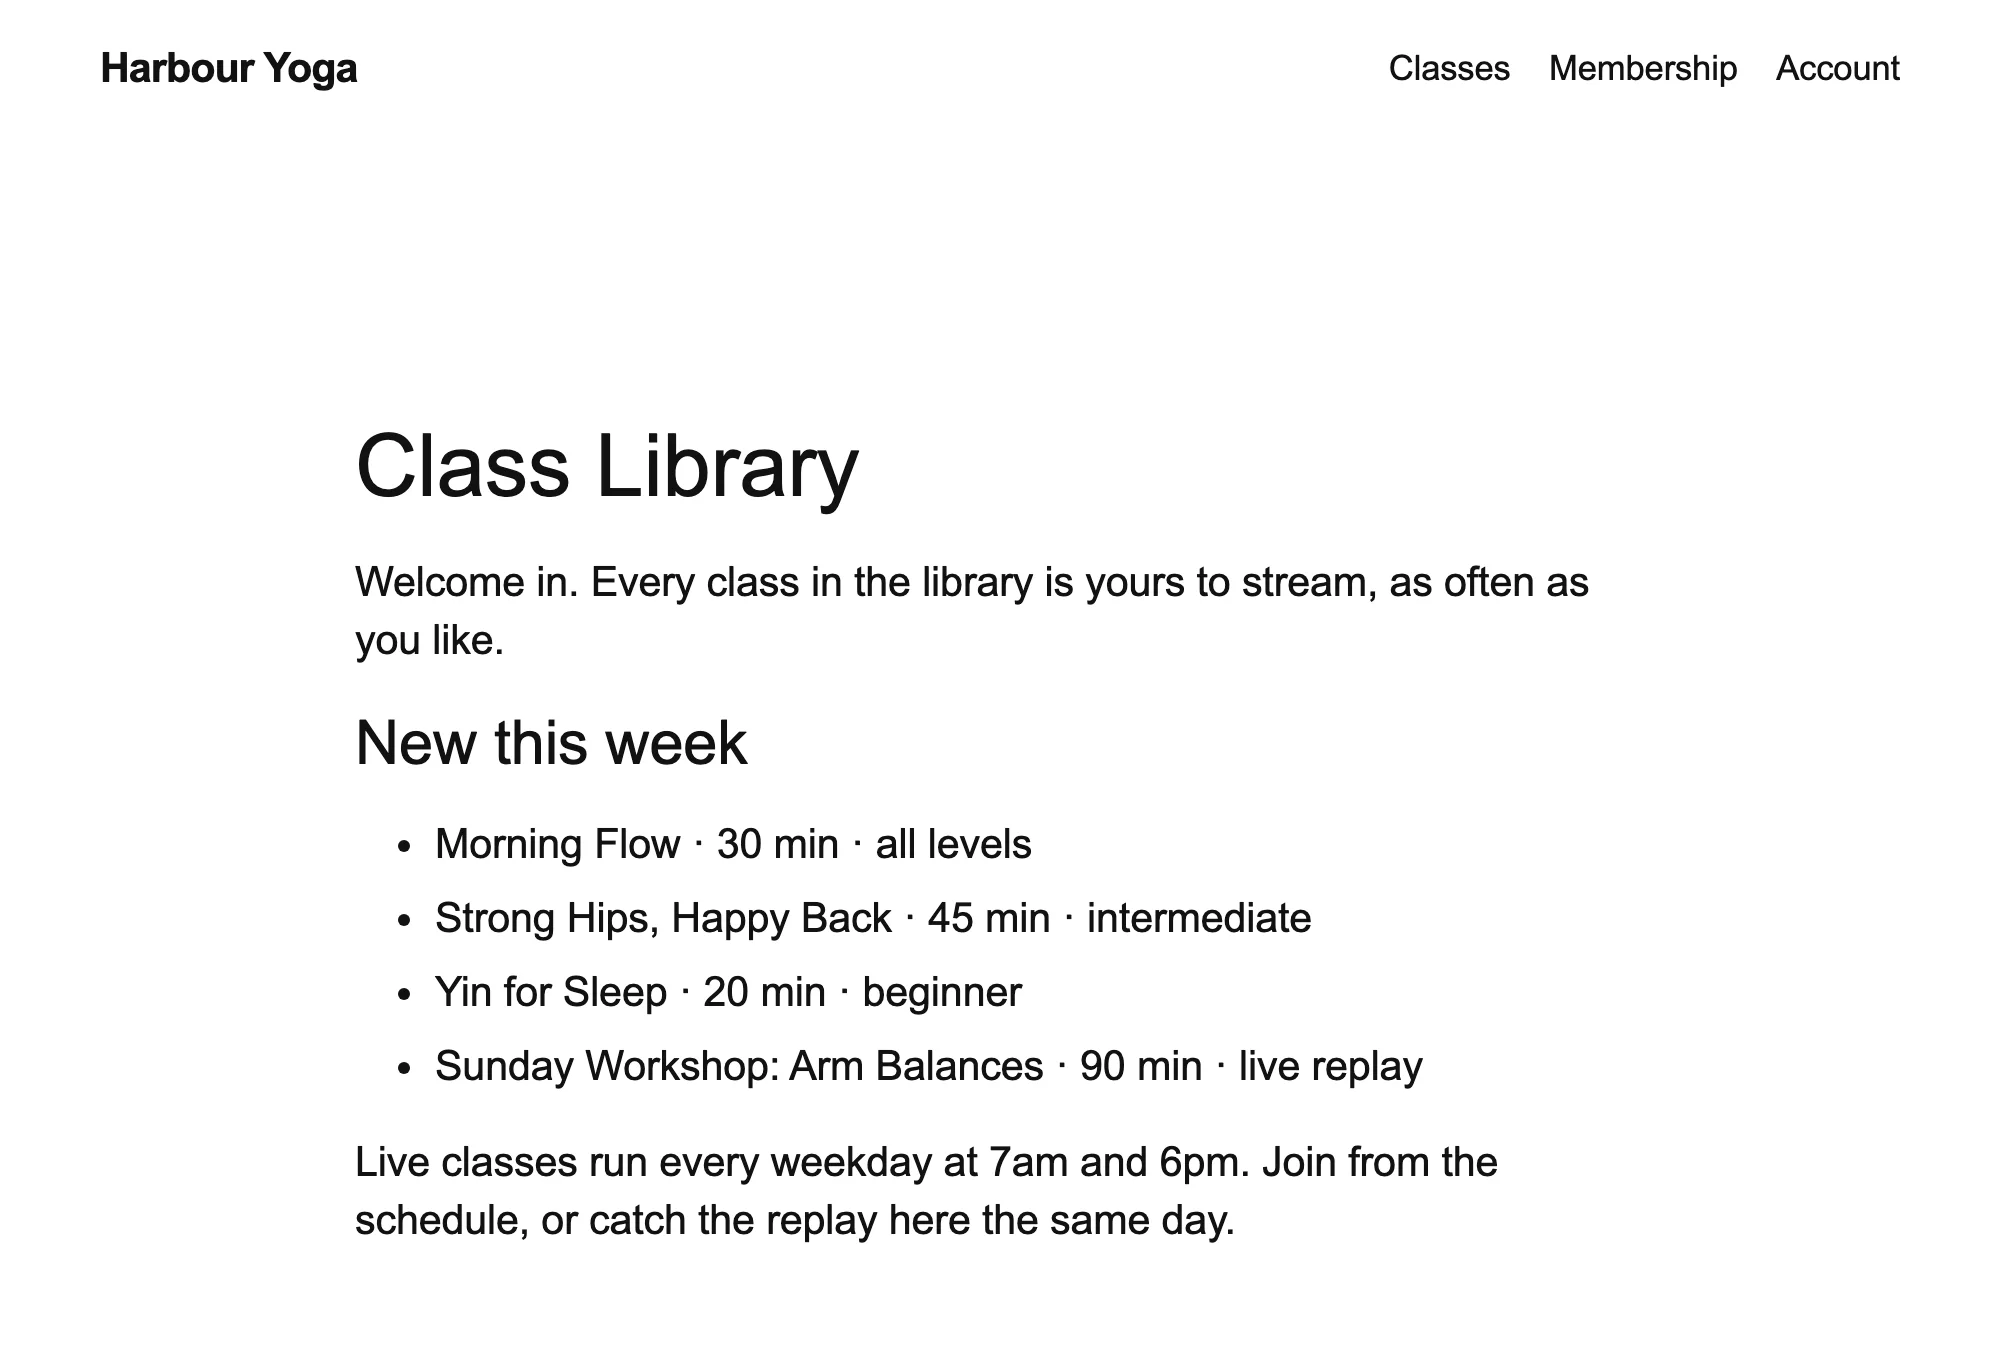 11The protected content shows
- 1The protected content shows
Back in WordPress, check both sides of the purchase. MemberPress → Plandalf → Events shows the purchase as Applied:
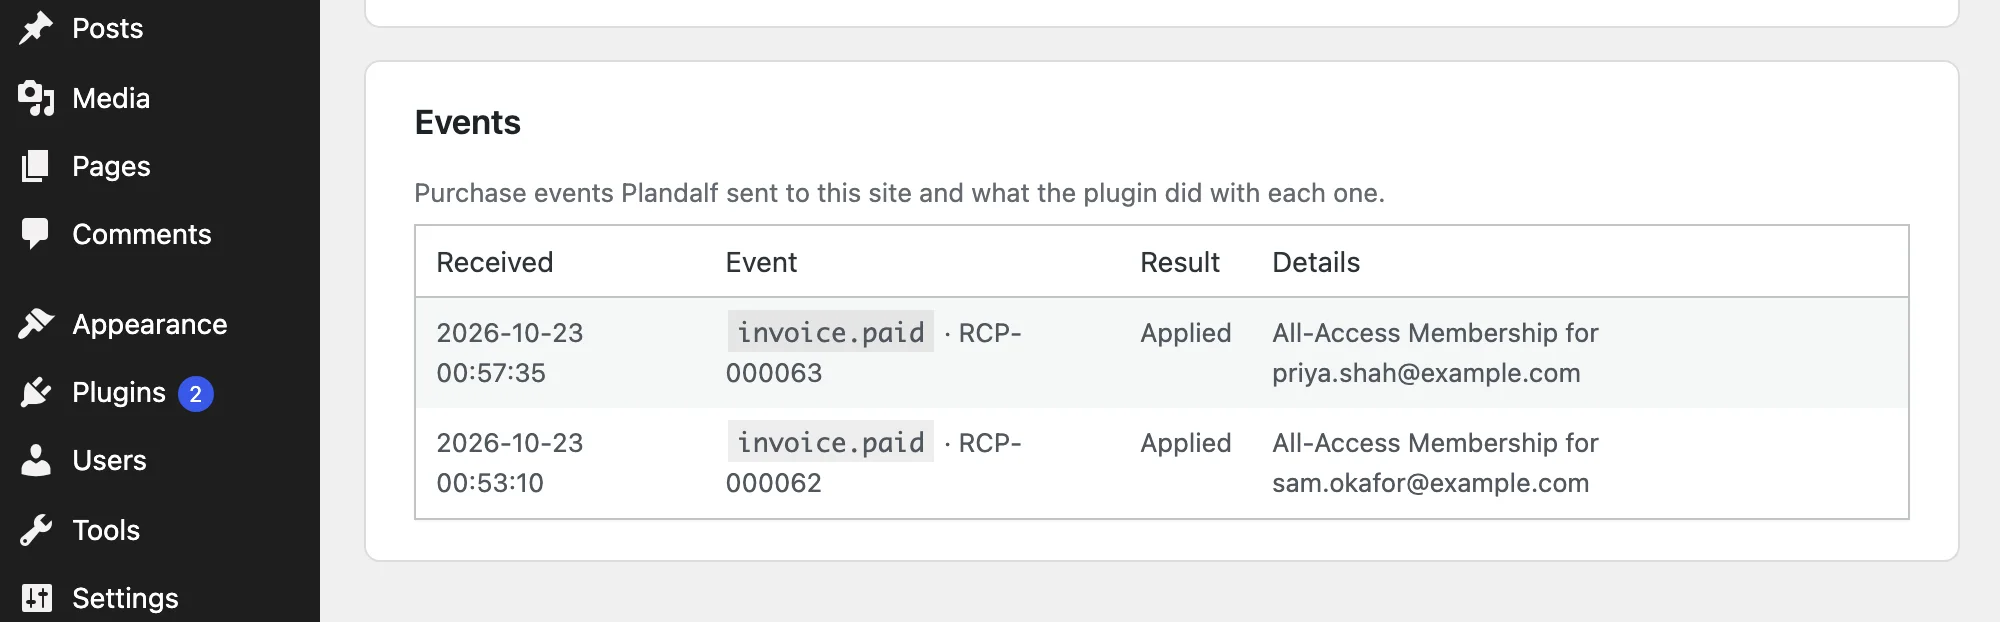 11The test purchase’s invoice22Applied: the membership was granted
- 1The test purchase’s invoice
- 2Applied: the membership was granted
And MemberPress → Transactions shows it as a normal transaction, numbered with its Plandalf invoice:
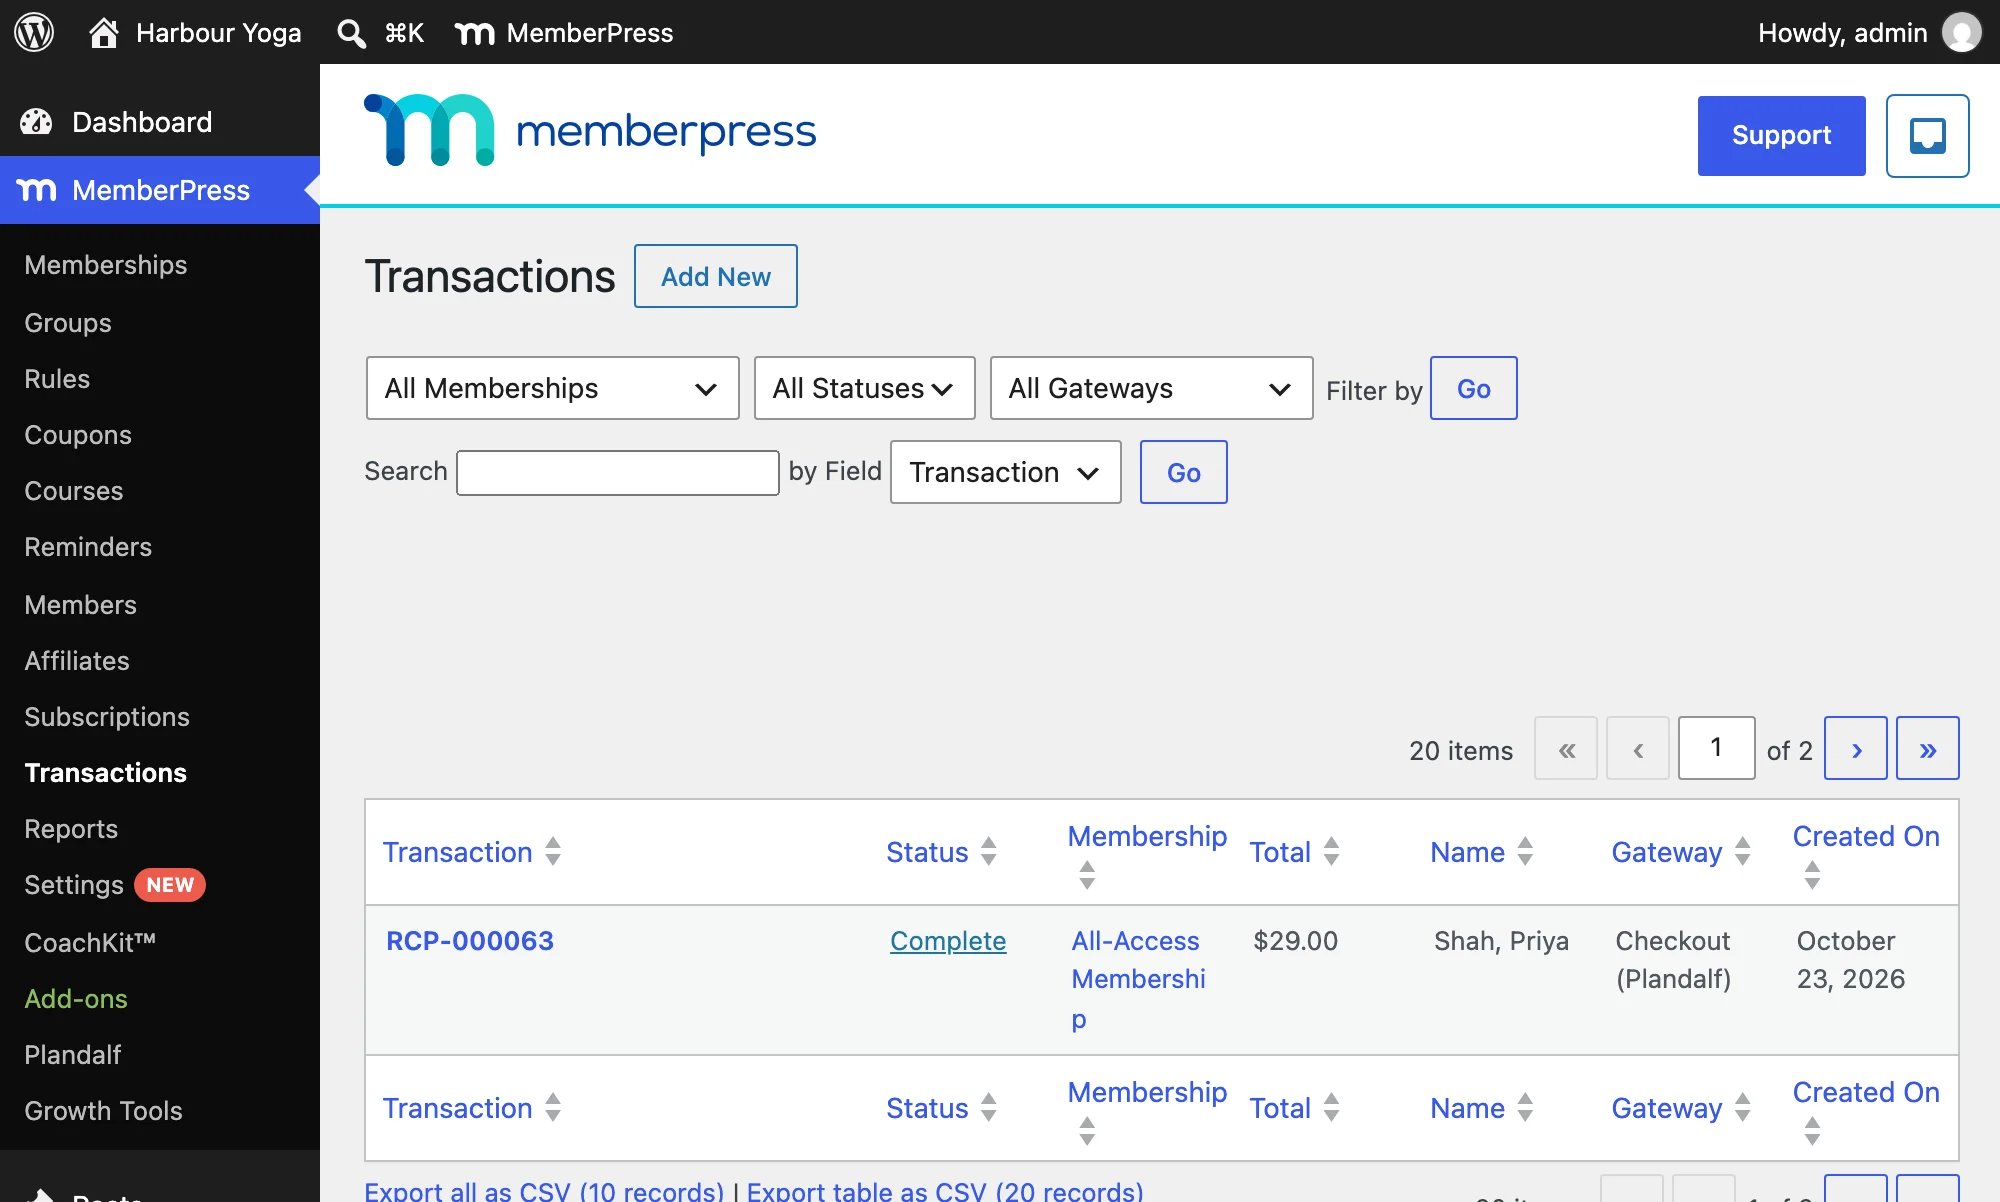 11Numbered with the Plandalf invoice22Complete33Paid through Plandalf
- 1Numbered with the Plandalf invoice
- 2Complete
- 3Paid through Plandalf
Before going live, also try a declined card (4000 0000 0000 0002), a purchase by a member who’s already signed in, a cancellation from the MemberPress account page, and a refund.
7. Go live
- On your live site, connect in Live mode. To switch a site that’s already connected, click Disconnect, then connect again.
- Connect your live Stripe account in Plandalf.
- Link your memberships and open each membership page to check its price.
- Let
/wp-json/plandalf/v1/eventsthrough your firewall or security plugin, and leave membership pages out of page caching. - Make one small real purchase, then refund it.
Members already paying through a MemberPress gateway carry on as before. Plandalf takes new purchases, so both can run side by side.
After launch
- Renewals extend the membership to the end of each paid period.
- Cancelling from the MemberPress account page cancels the Plandalf subscription at the end of the period. The member keeps access until then.
- Failed payments are retried by Stripe on your Stripe retry settings. If Stripe finally cancels the subscription, the membership ends.
- Refunds are issued in Plandalf. A full refund ends the membership.
- A daily check catches renewals and cancellations for subscriptions due in the next 48 hours, in case an event was missed.
What doesn’t work yet
- Checkout pages after payment, such as upsells.
- Promo pricing on membership pages. The page sells the linked price.
- MemberPress coupons. Create discounts in Plandalf instead.
- Proration when someone switches between memberships in a group.
- Moving existing MemberPress subscriptions to Plandalf.
If something’s not right
- Someone paid but has no membership. Look for their invoice in MemberPress → Plandalf → Events. If it’s missing, a firewall or caching plugin is blocking
/wp-json/plandalf/v1/events. Let it through and Plandalf keeps retrying for about a day. Don’t charge them again. - The event says Ignored. The price they bought isn’t linked to a membership on this site. Link it on the membership’s Plandalf tab.
- The page still shows the MemberPress form. The membership’s Plandalf tab has a Status line that says why. Clear your page cache after changing it.
- No set-password email. Check WordPress email and your SMTP plugin.
Developers can find the events, signatures and data the plugin writes in the MemberPress reference. The plugin’s source and releases are on GitHub.